

Shopify
Shopify is an e-commerce platform for creating and managing online stores, including storefronts, payments, shipping, and orders. The Antavo Shopify app connects Shopify stores to Antavo’s Loyalty Engine to synchronize customer and purchase data, calculate point earning according to an order’s transaction currency, and add loyalty functionality to storefront, checkout, and customer account pages.
Multiple Shopify stores can be connected to a single Antavo workspace. Each store has its own configuration interface, and additional stores can be synchronized automatically.
This guide explains how to install and connect the app, configure webhook processing, set up currency-specific point earning, add loyalty widgets, synchronize coupons, and verify customer activity received from Shopify.
Prerequisites
To connect the two systems, you need the following:
- Antavo workspace with the Shopify module enabled
- Shopify store
Installing the Antavo app in Shopify
First, you need to install the Antavo app in Shopify:
- Log in to Shopify
- Find the Antavo Shopify app in the Shopify App Store
- Click Install
- Grant the listed permissions by clicking Install
With these steps, you have successfully installed the app.
Antavo connection settings in Shopify
After installing the app, you’ll be redirected to the Antavo settings page where you can connect the two systems.
- Navigate to the Antavo connection settings section
- Stack name: Enter the Antavo environment to be connected to Shopify
You can find it in the URL where you access it from your Antavo workspace: https://loyalty.{environment}.antavo.com. Make sure you enter the environment name in all lowercase letters. - Provide the API credentials (API key and secret) of your Antavo workspace
- Select the transaction identifier used for data transmission to Antavo
- Select the customer identifier used for data transmission to Antavo
If a customer's email address is modified in Shopify under the Edit Contact Information page, Antavo will automatically update its system to reflect the change. This ensures that modifications to the email address do not disrupt data synchronization between the two platforms. - Enable Extract discount to subtract discounts from product subtotals
- Enable refund to manage refunds after a checkout has been fulfilled
This requires that the Orders updated setting is mapped with an Antavo event in the Shopify settings. - Enable product composite ID for Antavo to generate IDs by combining product and variant IDs with a hyphen
Enabling this is required if you have enabled refunds. - Click Submit to save configurations and activate Shopify webhooks for data forwarding to Antavo based on your webhook settings.
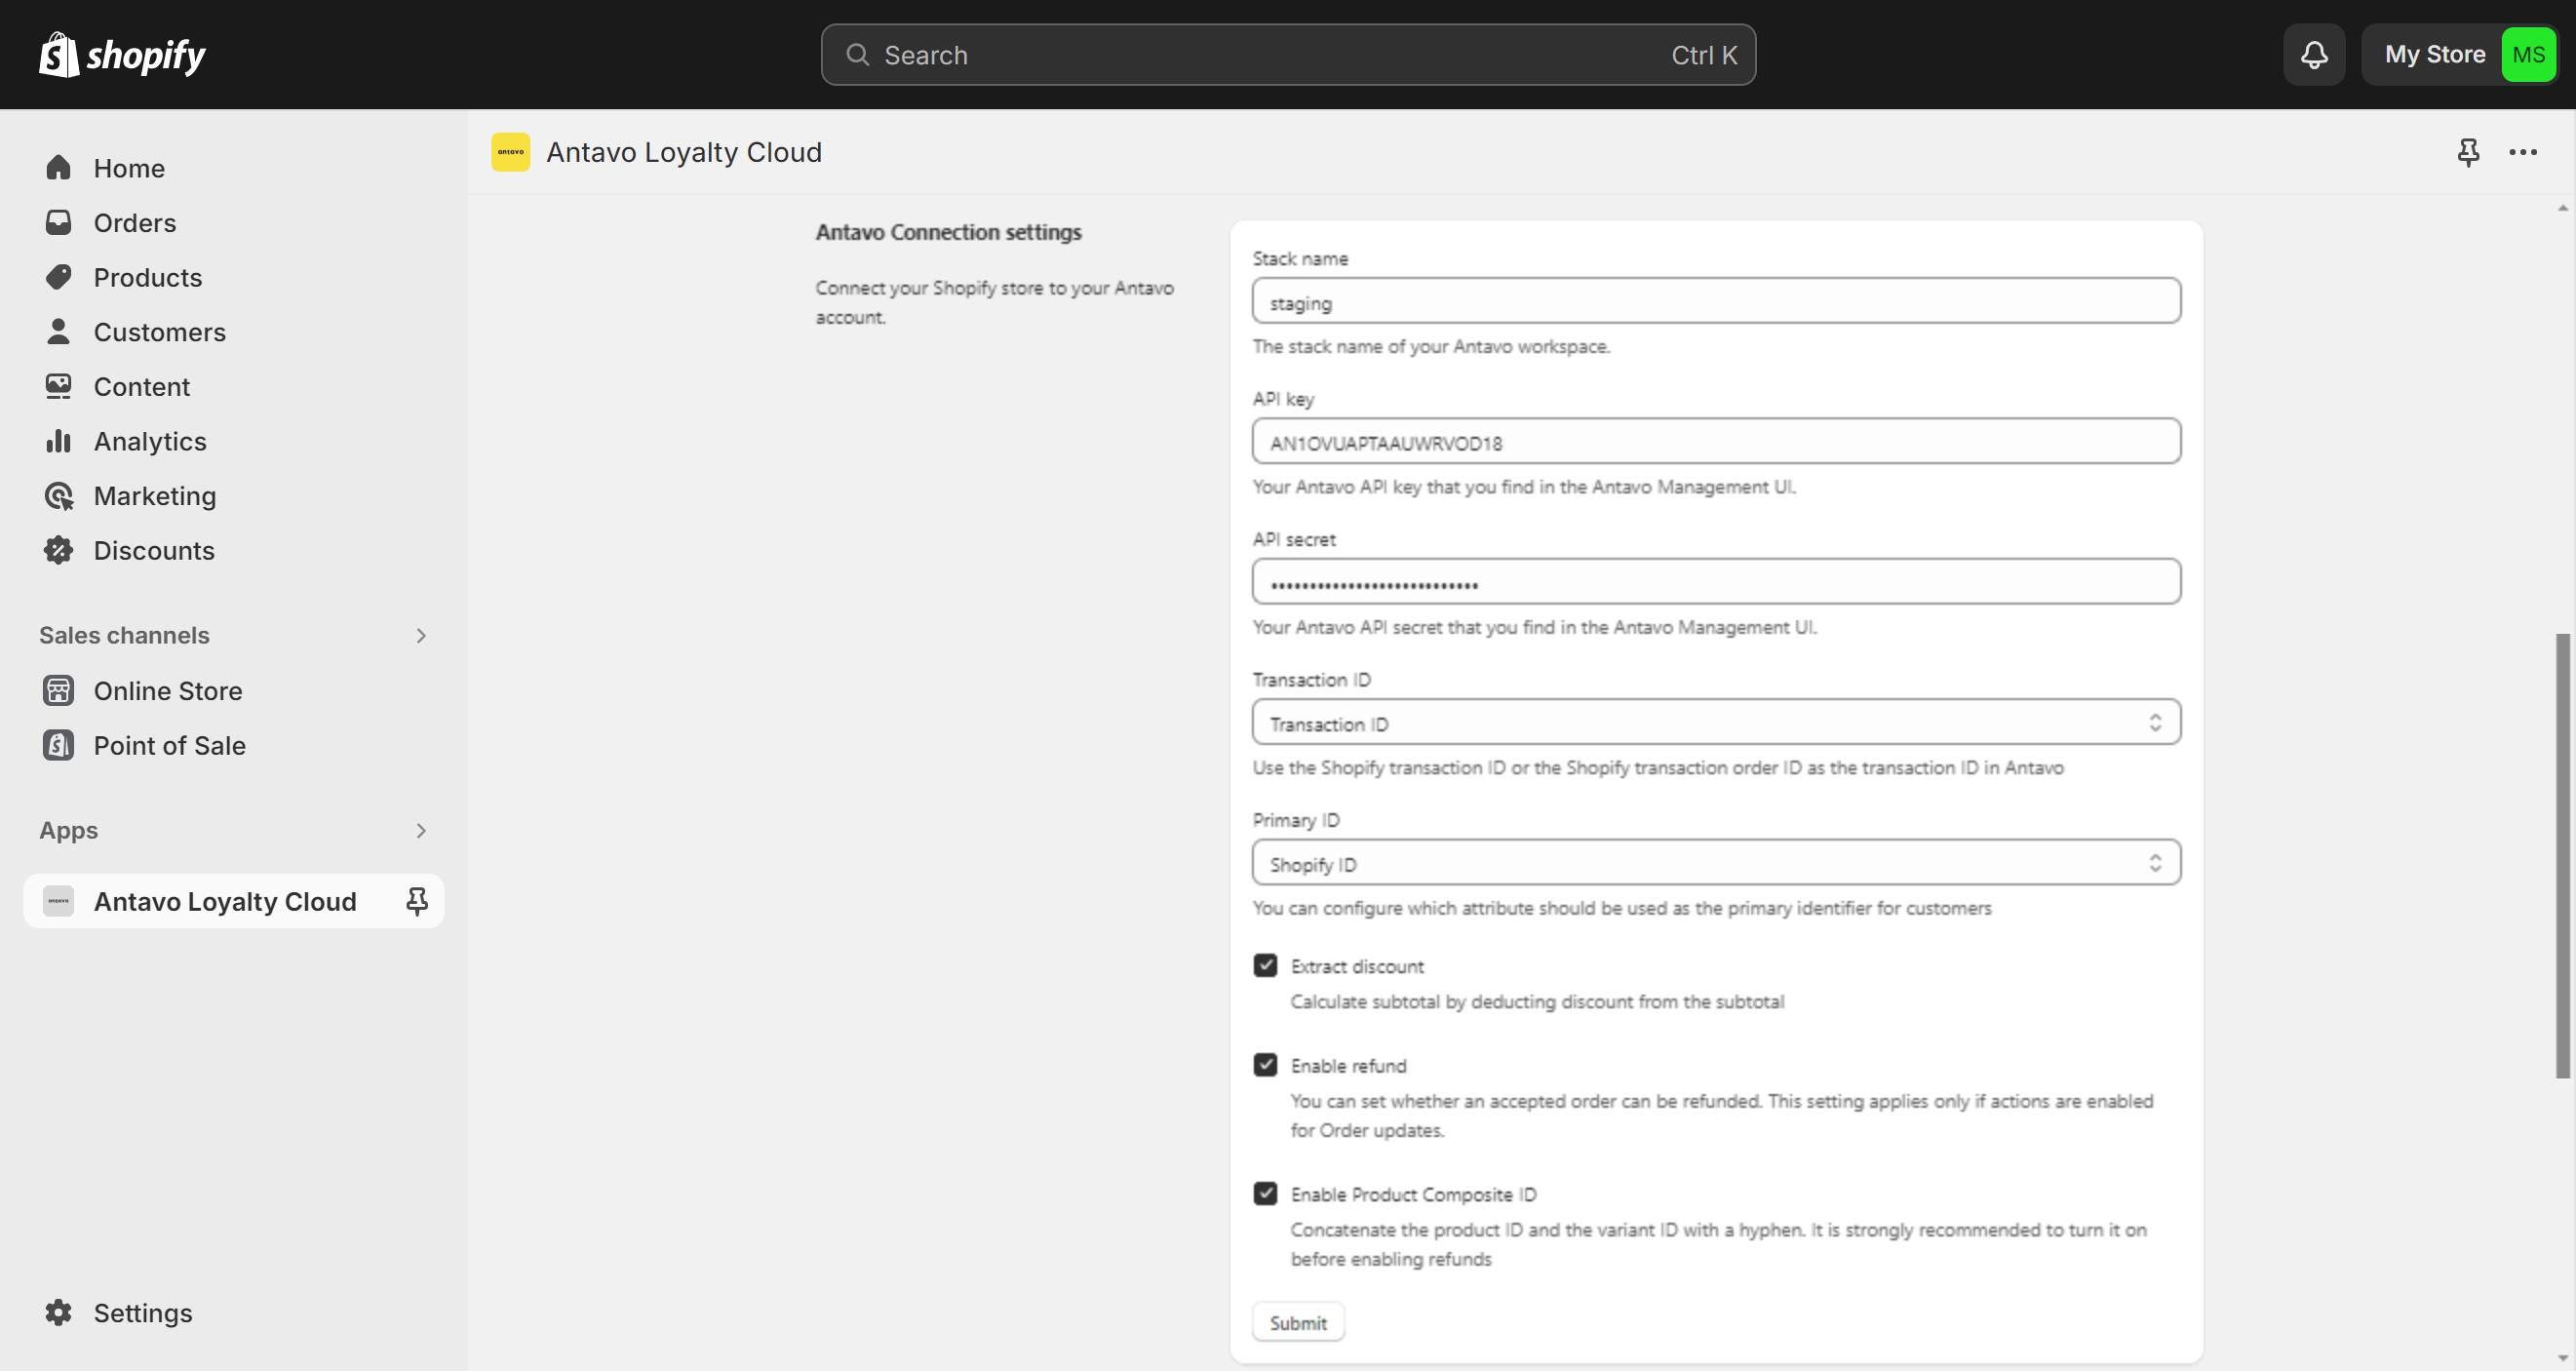
If the connection is successful, a success message will be displayed, the webhooks will be activated, and your Shopify stores will appear when you access the Shopify module in Antavo through the Modules menu.
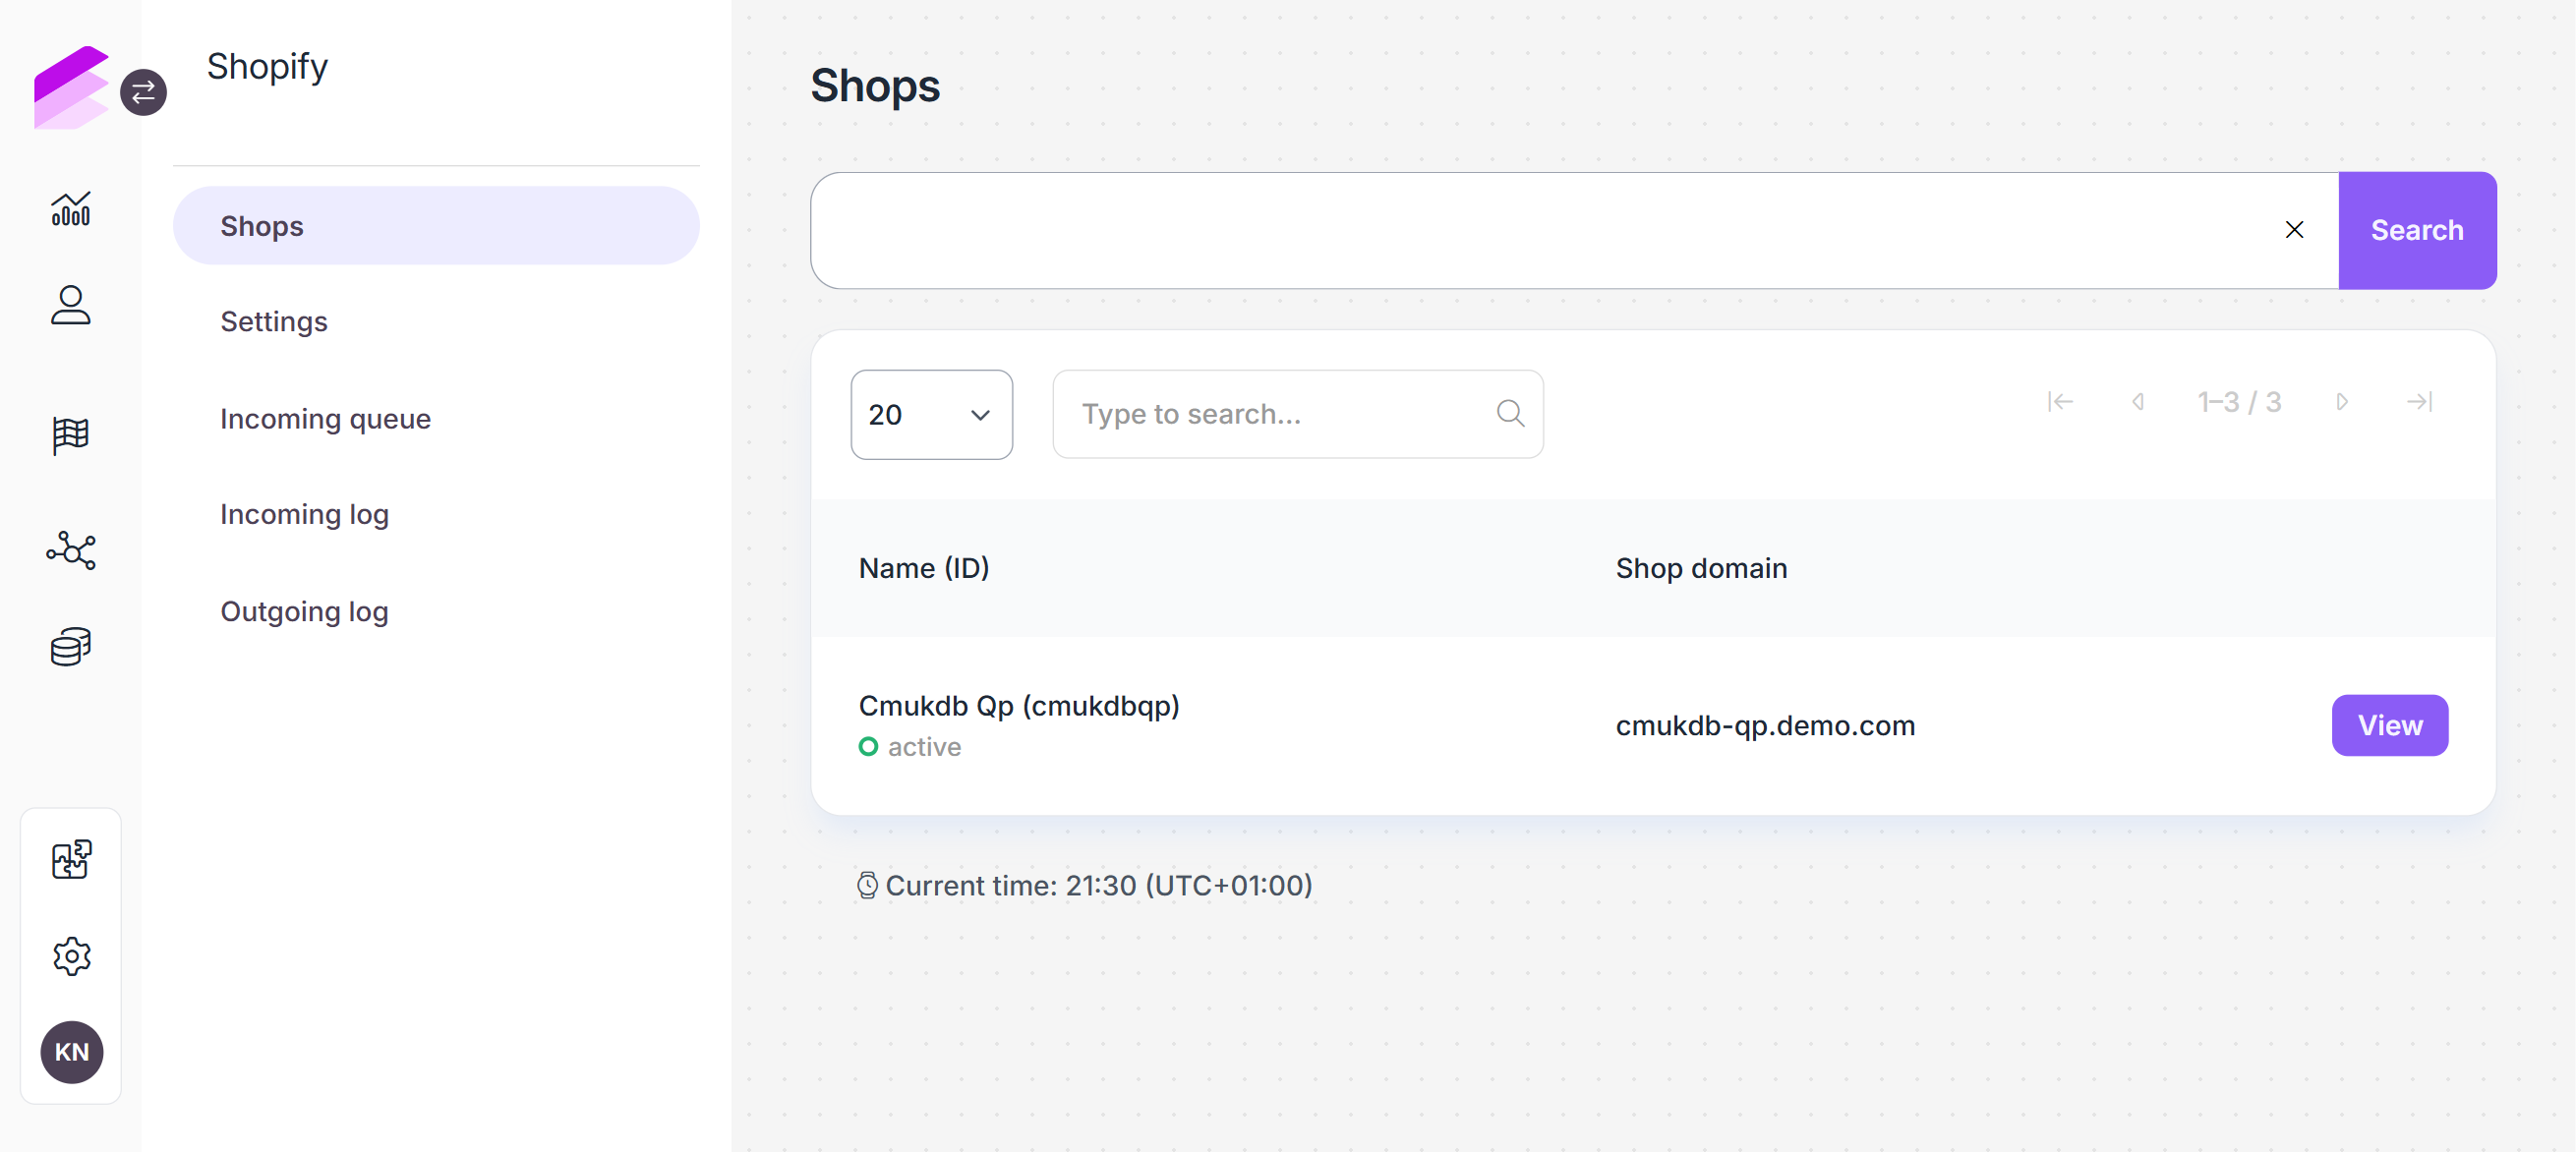
If you need to reconnect the webhooks, click Register webhooks at the bottom of the Antavo settings in Shopify.
Configure the cron job
To create a new cron job in Antavo for processing incoming webhooks from Shopify to Antavo, follow these steps:
- Navigate to the Settings menu in the Antavo Management UI
- Open the Jobs tab and click Create new job
- Name your job
- Configure the command settings as follows:
- Task: shopify-incoming
- Action: process
- Click Create at the bottom of the page
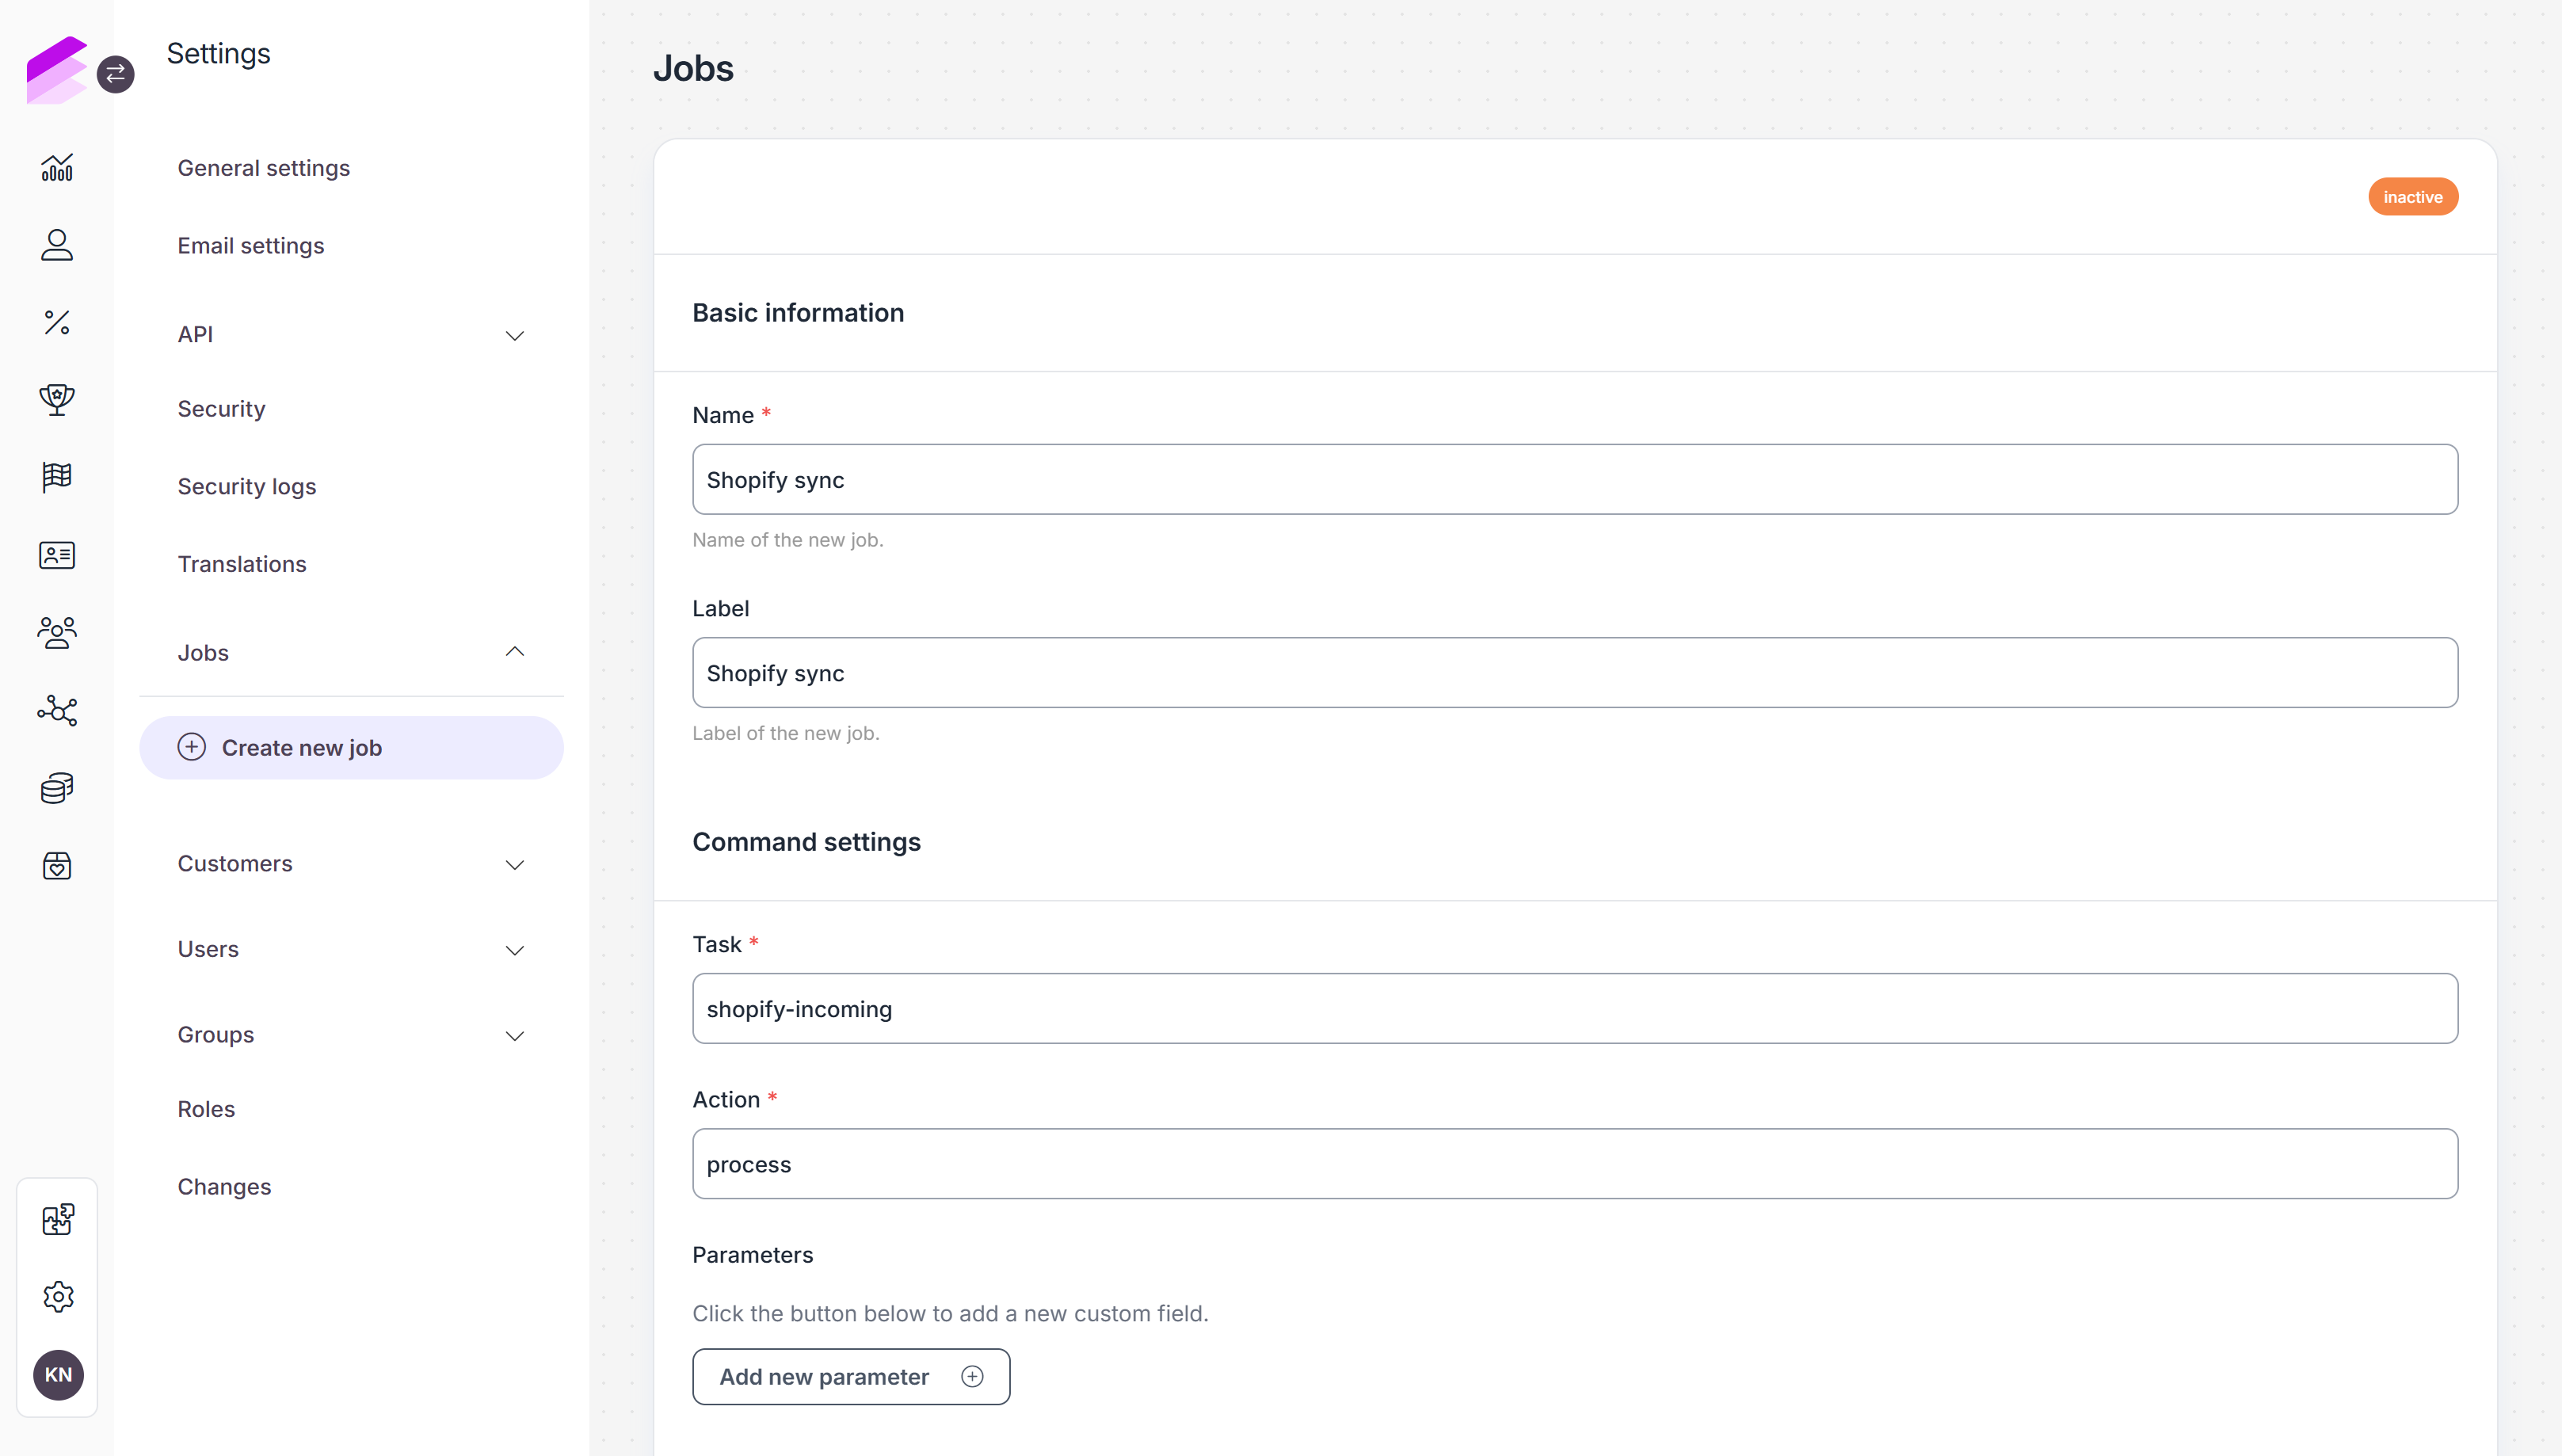
For detailed instructions on using the job editor, please refer to the user manual.
Antavo webhook settings
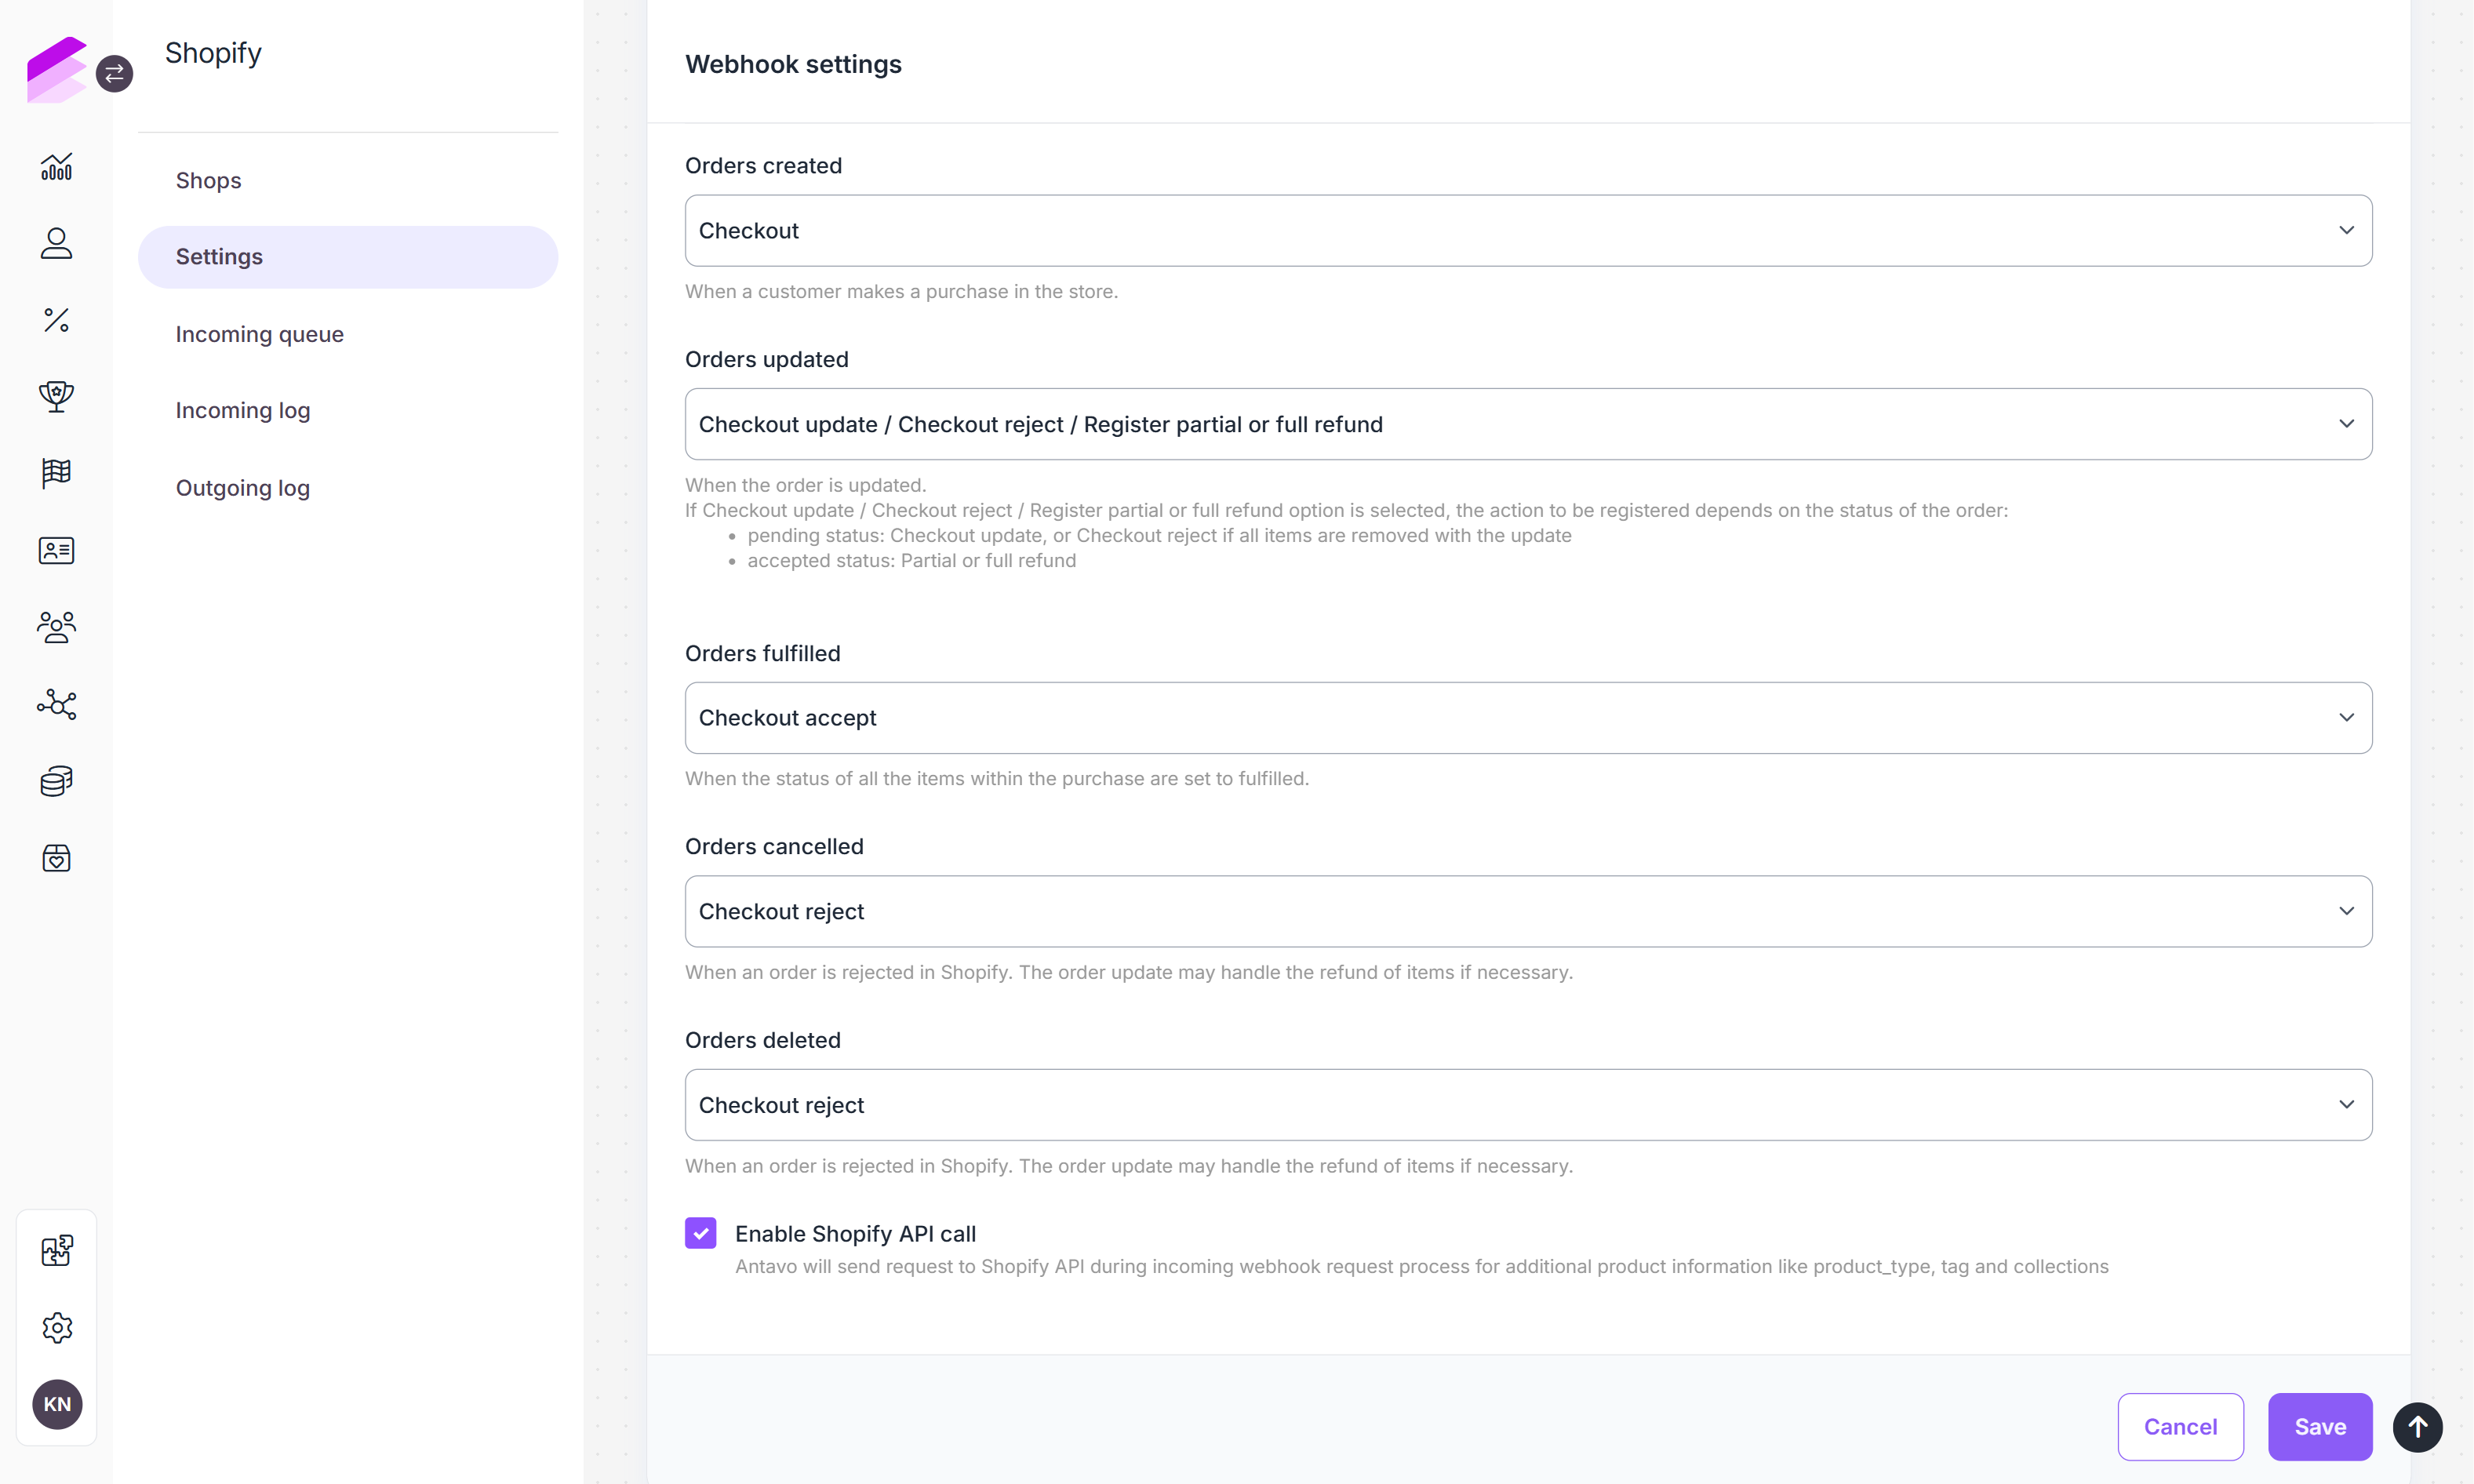
The fields under the Settings tab allow you to pair the corresponding webhook responses, allowing for seamless management and utilization of their functionalities.
To configure webhook settings for mapping Shopify events to Antavo events and ensure they are registered in the customer event streams, follow these steps:
-
Orders created: Choose whether to register an event when an order is placed in Shopify.
Options include Do nothing, or registering a Checkout -
Orders updated: Select the event to register when a shop administrator modifies a transaction in Shopify, such as updating buyer details or adding new items to the cart. Refunds can also be managed through this webhook.
Options vary based on the status of the Checkout accept module:- If disabled: Do nothing, Register partial or full refund
- If enabled: Do nothing, Checkout update, Register partial or full refund
Checkouts remain pending when Shopify sends interim order updates with no fulfillable items. The system waits for a meaningful follow-up event (such as fulfillment, cancellation, deletion, or checkout acceptance) before finalizing the transaction status.
-
Orders fulfilled: Select the event to register upon order fulfillment in Shopify.
Options vary based on the status of the Checkout accept module:- If enabled: Do nothing, Checkout, Checkout accept
- If disabled: Do nothing, Checkout
-
Orders cancelled: Select the event to register when an order is canceled in Shopify.
Options vary based on the status of the Checkout accept module:- If enabled: Do nothing, Checkout reject
- If disabled: Do nothing
-
Orders deleted: Select the event to register when a shop administrator deletes an order in Shopify.
Options vary based on the status of the Checkout accept module:- If the Checkout accept module is disabled: Do nothing
- If the Checkout accept module is enabled: Do nothing, Checkout reject
NoteTo register
checkout_update,checkout_acceptandcheckout_rejectevents, ensure the Checkout accept module is activated for validation and response handling. Contact Antavo Service Desk for assistance enabling this module.
Shopify API calls
Use the Enable Shopify API Call checkbox to control whether product details (like type, tags, and collections) are fetched from Shopify during webhook processing. Enable if you need these details or disable to minimize API calls.
Incoming queue
When Shopify sends webhook messages to Antavo, they undergo asynchronous processing through specific endpoints:
tags/addedtags/removedcustomers/updateorders/cancelledorders/createorders/deleteorders/fulfilledorders/updatedproducts/createproducts/deleteproducts/update
Requests to these endpoints are queued for processing, enabling instant responses to Shopify regarding event registration.
In the Antavo Management UI under the Incoming queue tab, you can monitor queued items, including
- ID: Unique identifier of the request generated by Antavo.
- Target URI: The endpoint where the request was sent.
- Number of retries: Retry attempts (up to 5) for failed event registrations.
- Status:
- Pending: The request is queued but has not yet been processed.
- Failed: The request failed after 5 unsuccessful attempts.
- Timestamp: Date of request submission to Antavo.
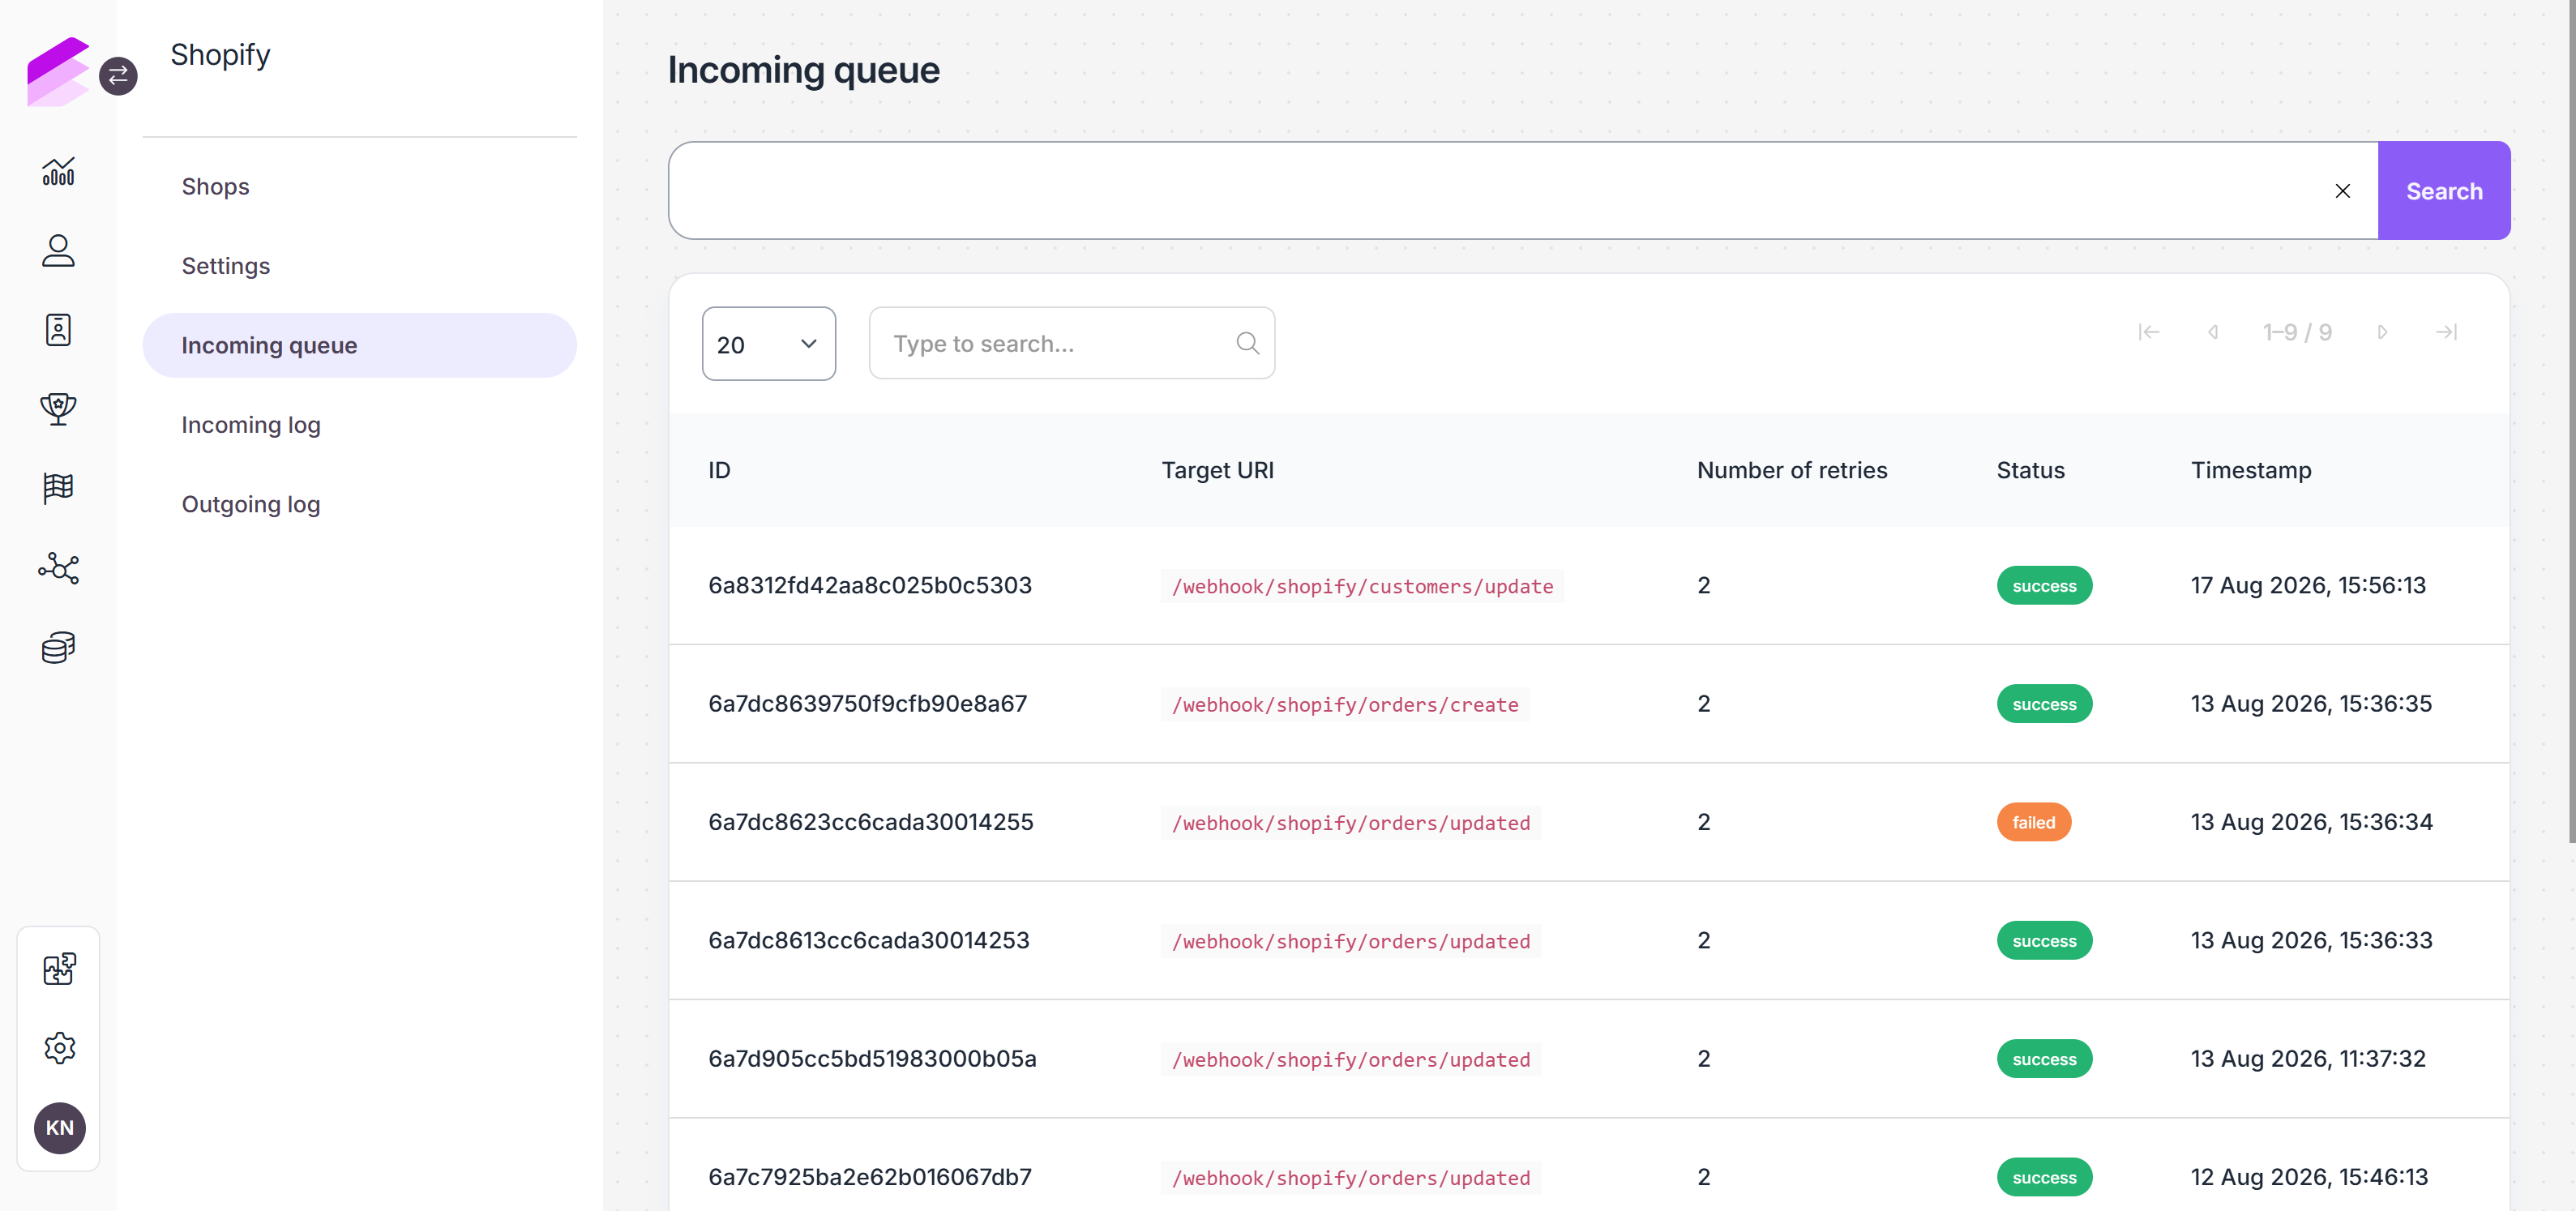
Entries are automatically removed from the queue upon successful processing.
Multi-currency support
The Shopify integration automatically calculates points based on the transaction currency of the order and the corresponding Earn rule configured in Antavo.
If an Earn rule is configured for the currency used in the purchase, points are calculated according to that rule. If no Earn rule is available for the transaction currency, no points are awarded for the purchase.
Make sure to configure Earn rules for all currencies that should be eligible for point earning.
Widgets
Widgets add loyalty program information and actions to Shopify online store, checkout, order status, and customer account pages without custom development. Depending on the widget, customers can view rewards, challenges, tiers, and point information, manage their loyalty membership, redeem points during checkout, or claim points for eligible purchases made before joining the program.
Online store theme widgets
Online store theme widgets are added through the Shopify theme editor and can be placed on supported store pages. The following widgets are available:
- Customer Campaigns: Displays ongoing campaigns the customer can participate in (configured in the Workflows module).
- Customer Challenges: Lists challenges that the customer can complete (configured in the Challenges module).
- Customer Contests: Shows contests customers can join (configured in the Contest lite module).
- Customer Coupons: Displays coupons assigned to the customer.
- Customer Details: Provides a breakdown of points (spendable, spent, pending, reserved, expired) and tier-specific details if the Tiers module is configured.
- Customer Rewards: Shows available rewards for the customer to claim (configured in the Rewards module).
- Product Points: Displays points that can be earned by purchasing specific products (this widget can only be added to product pages).
- Customer Tiers: Displays the customer's current tier, associated benefits, and progress toward the next tier (configured in the Tiers module)
- Loyalty opt-in component: Displays a customizable button that lets customers join the loyalty program.
- Loyalty opt-out component: Displays a customizable button that lets loyalty members leave the program.
Adding widgets to your storefront
To add a widget to your Shopify storefront, follow these steps:
- Navigate to the theme editor:
- In the Shopify admin, go to Online Store > Themes
- Click Edit theme next to the theme you want to edit
- Use the page selector in the theme editor to open the page where you want to add the widget
NoteOnline store theme widgets can only be added to supported theme pages. To add loyalty functionality to checkout, order status, or customer account pages, use the checkout and customer account widgets.
- Add the widget block or section:
- Under Templates, click Add block or Add section, depending on where you want to place the widget
- Open the Apps tab and select the Antavo widget
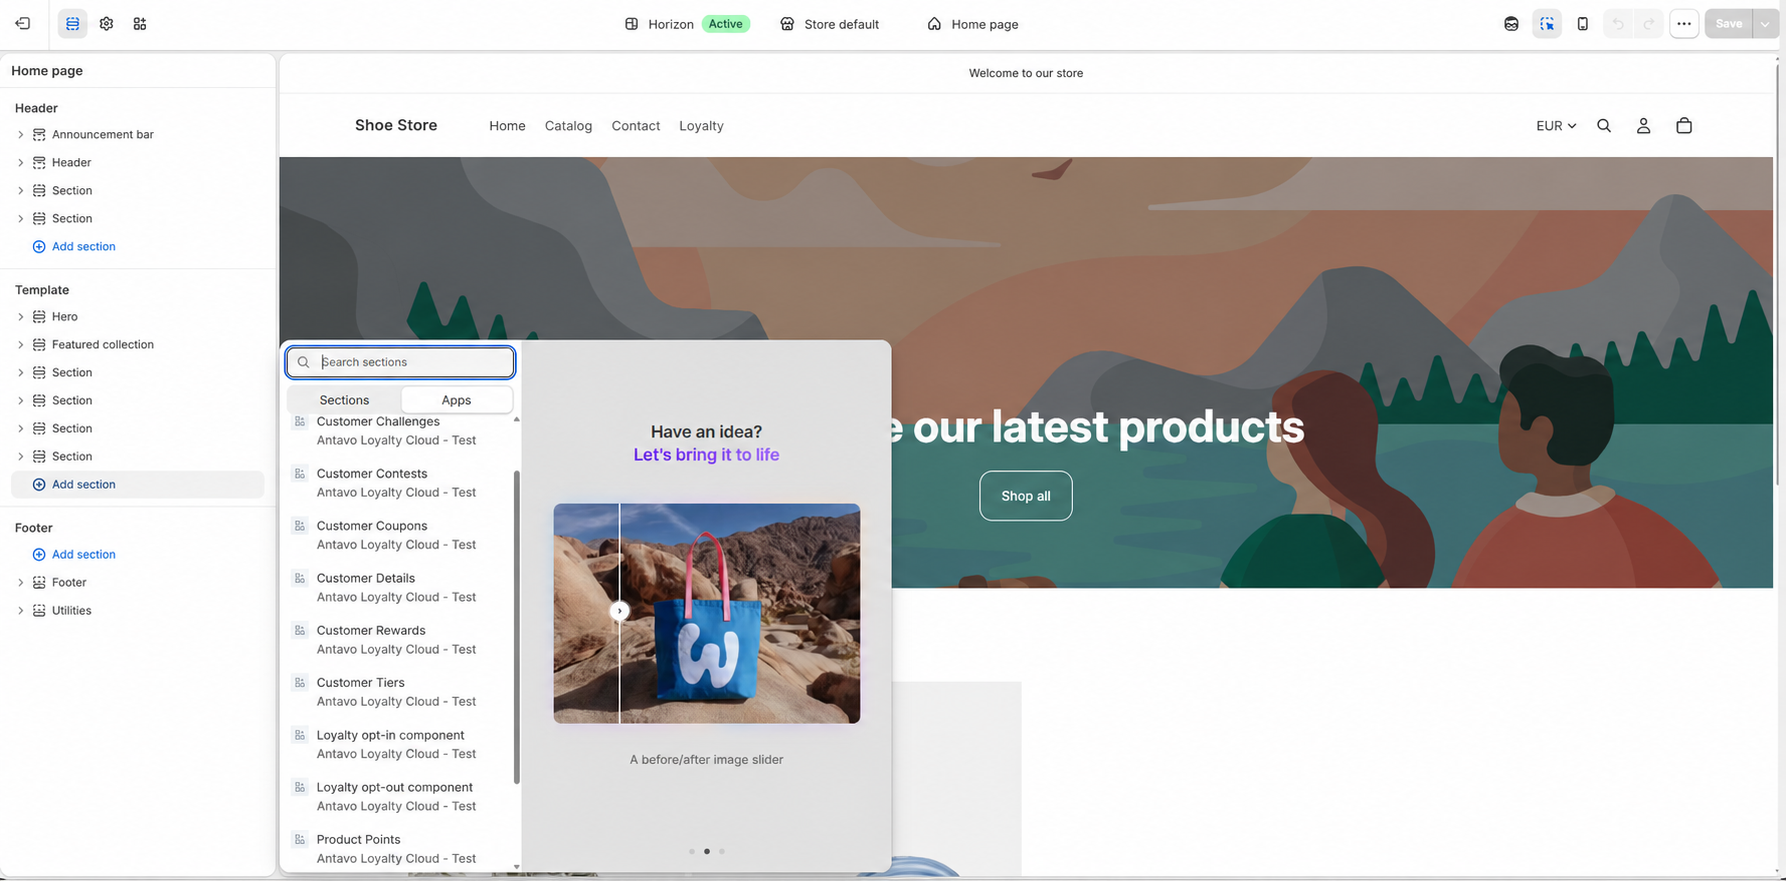
- Configure the widget
For the Customer Tiers, Loyalty opt-in, and Loyalty opt-out widgets, use the sidebar to customize the displayed content, appearance, and visibility. Available settings vary by widget. - Save your changes:
- Click Save in the upper right corner of the page to ensure the widget is visible on the selected page.
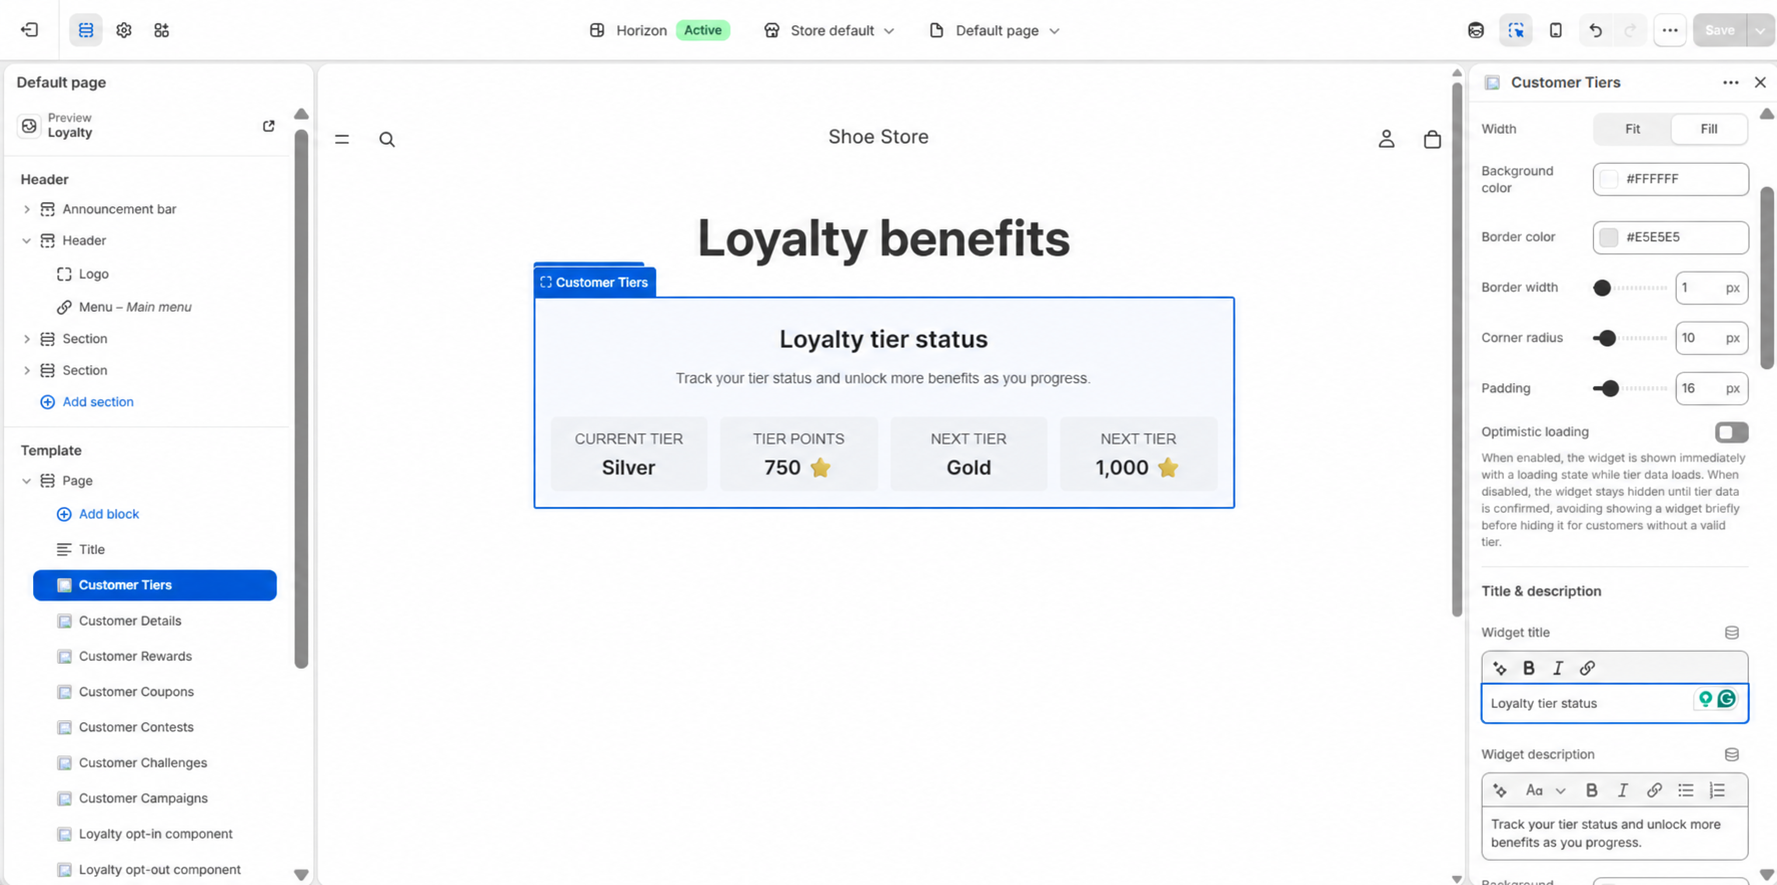
Example: Inserting the Customer Tier widget
Widget settings
Under the Widget settings tab, you can select the tier structure used by the Customer Details widget and customize the general widget design.
- In your Shopify store admin panel, go to Apps > Antavo Loyalty Cloud > Widget Settings
- Tier structure configuration
Select the tier structure used to display the customer’s current tier status and the points required to reach the next tier in the Customer Details widget. This is available only if the Tiers module is enabled. - Customize widget appearance:
- Button styling: Set the colors for CTA buttons (background, hover background, and button text).
- Color: Set the background color and text color.
- Border: Adjust the border width and radius using the slider, and select a color for the widget border.
- Branding: Use the slider to set the padding between the widget content and the border.
- Click Submit at the bottom of the page to save settings.
After logging into the store, customers can see the widgets you’ve configured based on the settings applied. Images displayed in the widgets are sourced from the Antavo Management UI module configuration pages, where they are uploaded.
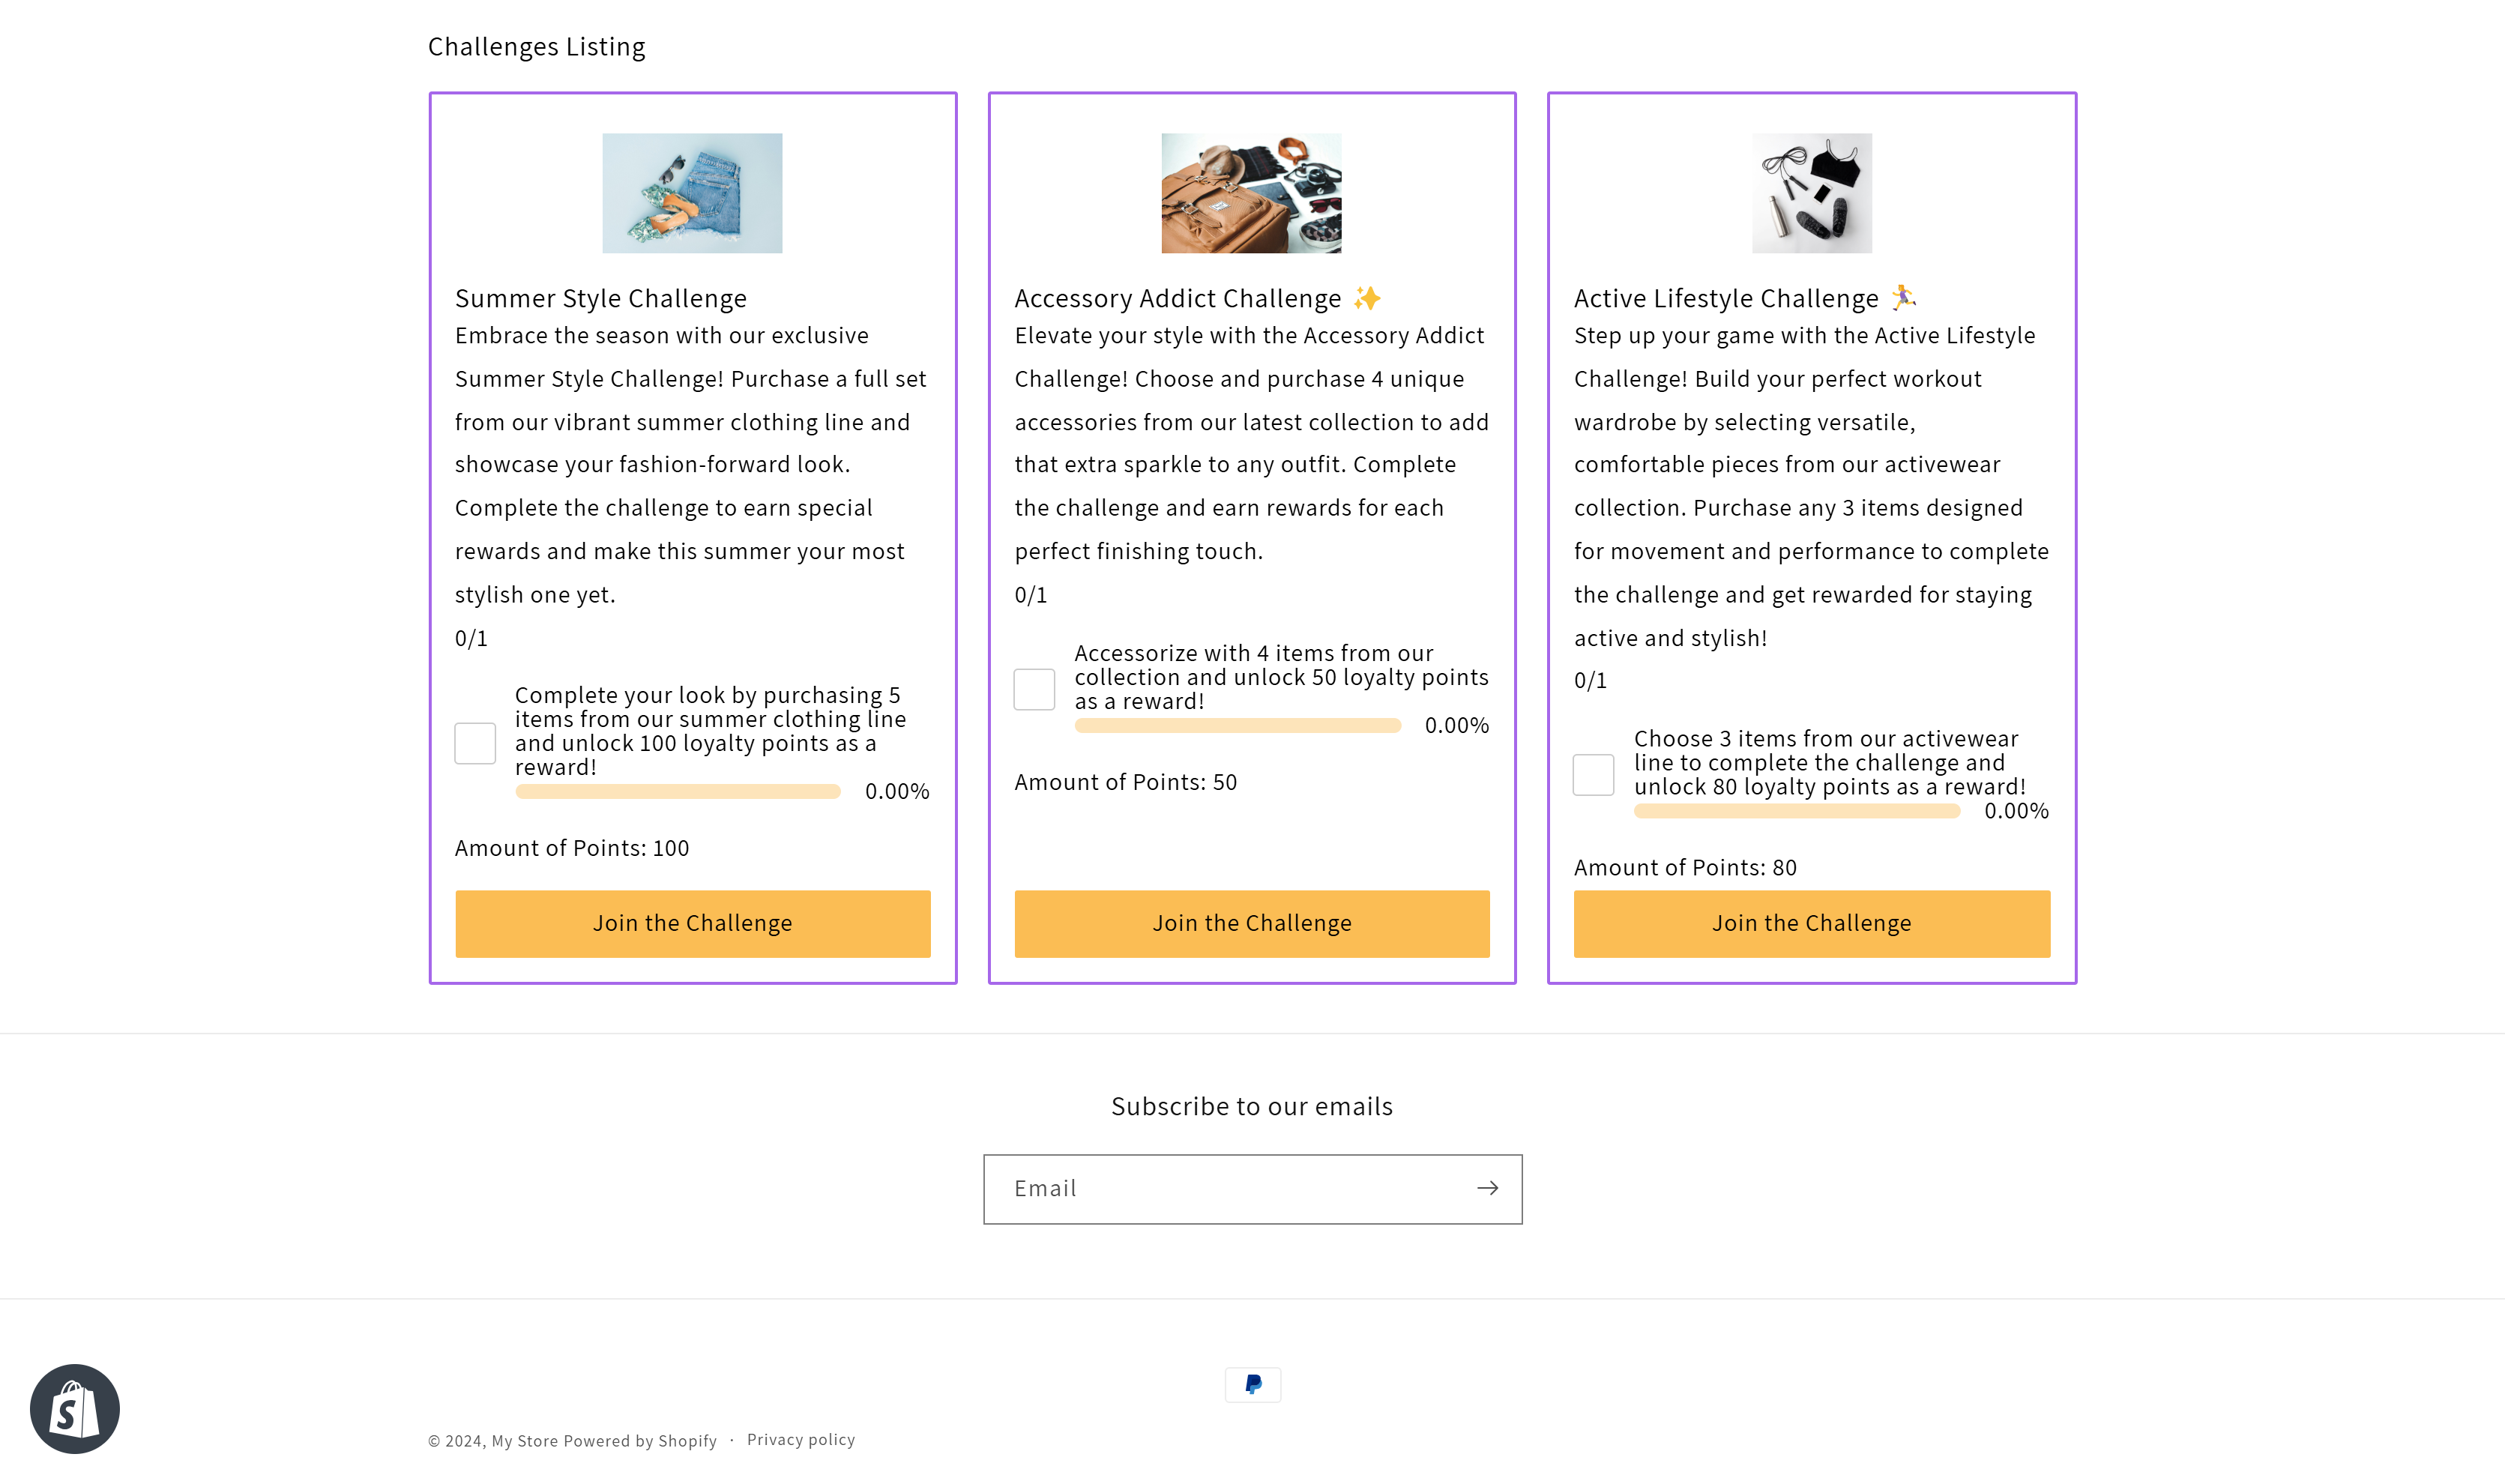
Example: Customer Challenges widget with specific display settings.
NoteFor further customization, you can edit the theme code directly to tailor additional aspects of your store’s appearance.
Checkout and customer account widgets
Widgets can be added to the Checkout, Order status, and Customer account pages through the Checkout and customer accounts editor. These widgets are separate from the online store theme widgets and do not use the appearance settings configured under Widget Settings.
Available labels and messages can be customized directly in the Checkout and customer accounts template editor pages.
The following widgets are available:
| Widget | Page | Additional Configuration |
|---|---|---|
| Loyalty Points | Checkout | Apps > Antavo Loyalty Cloud > Points Burn |
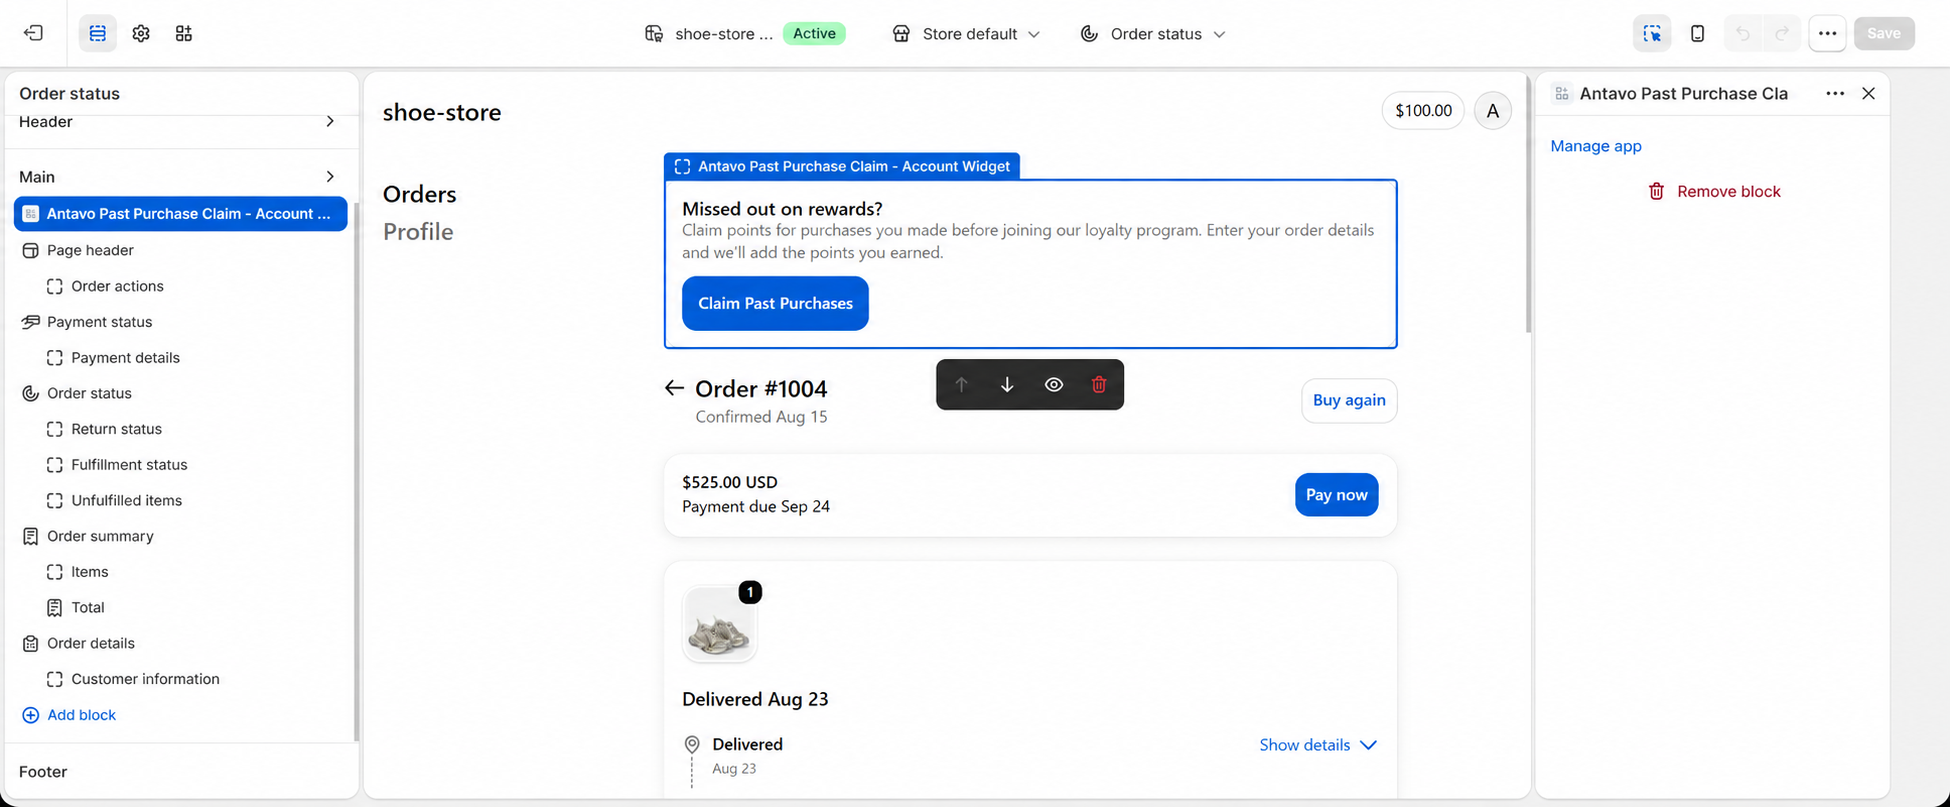
| Past Purchase Claim | Order status | Apps > Antavo Loyalty Cloud > Past Purchase Claim |
| Customer Tiers | Profile | Checkout and accounts template editor |
| Activity History | Profile | Checkout and accounts template editor |
Shopify availabilityThe Loyalty Points widget is added to the checkout flow and therefore requires Shopify Plus. Shopify supports widgets on upgraded Order status and current customer account pages on the Basic plan or higher. The Customer Tiers and Activity History widgets require customer accounts rather than legacy customer accounts, while Past Purchase Claim requires the upgraded Order status page.
Adding a checkout or customer account widget
To add a widget to a checkout or customer account page:
- In the Shopify admin, go to Settings > Checkout
- Under Configurations, click Customize next to the checkout configuration you want to edit
- Use the page selector at the top of the checkout and accounts editor to open the required page
- Click the Apps icon in the upper-left corner of the editor
Under Antavo Loyalty Cloud, click the + icon to add a widget. The Add to menu displays the page that the widget supports. Click the page name to add the widget.
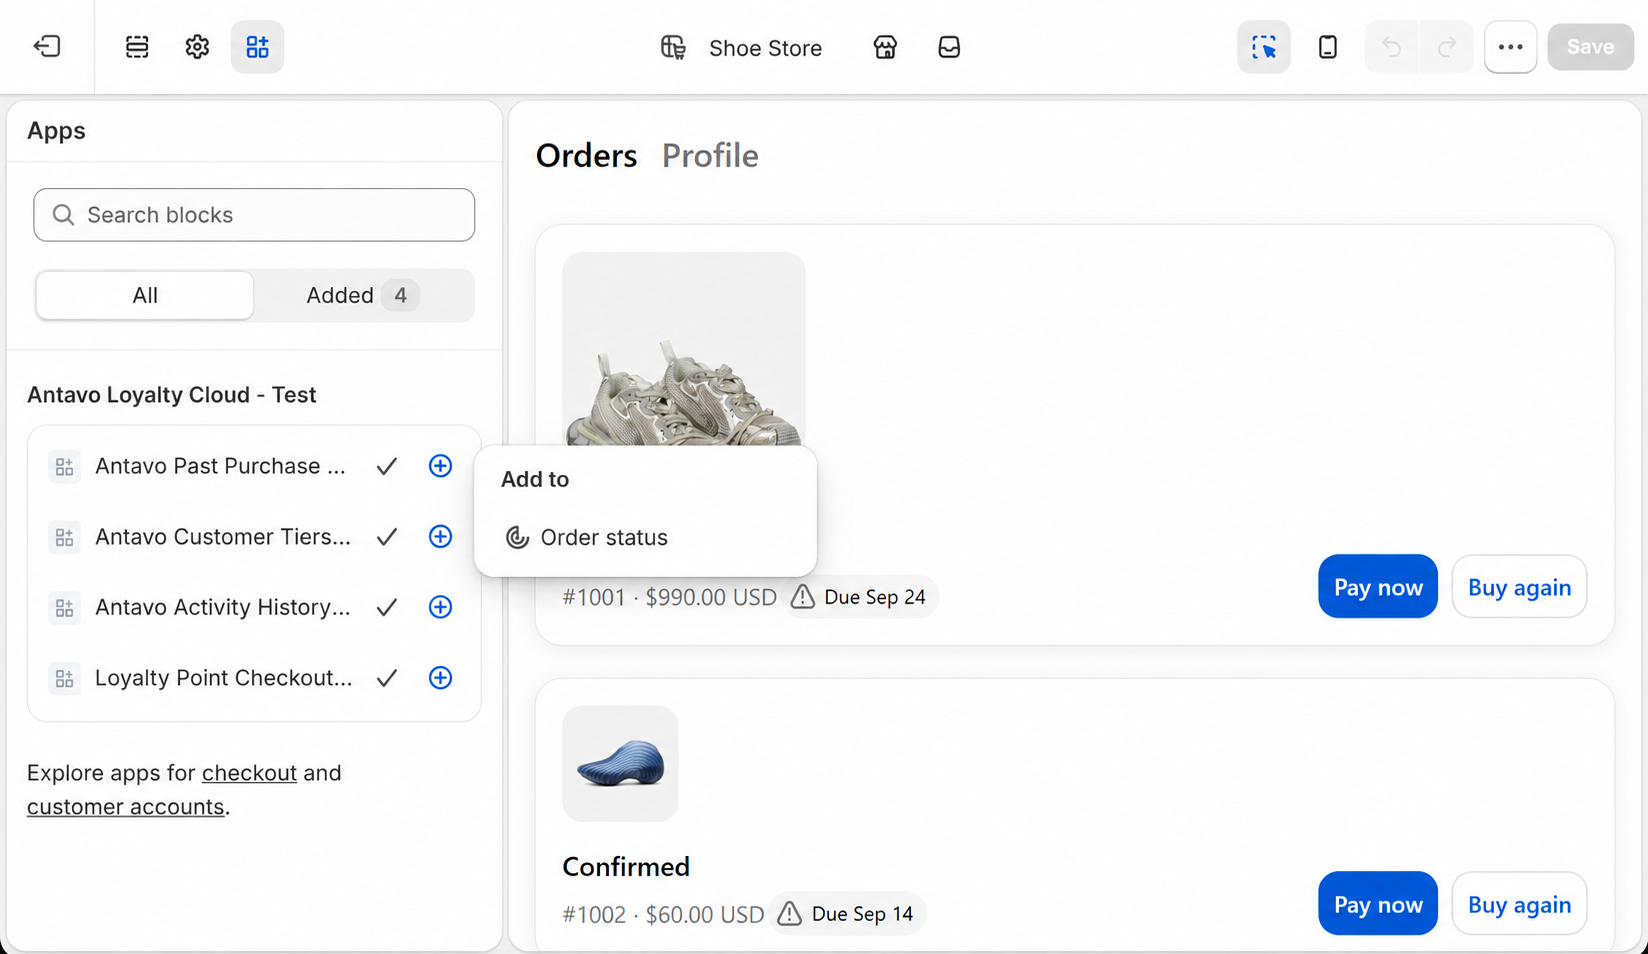
- Configure any available labels and messages in the right sidebar.
- Click Save
Loyalty Points widget
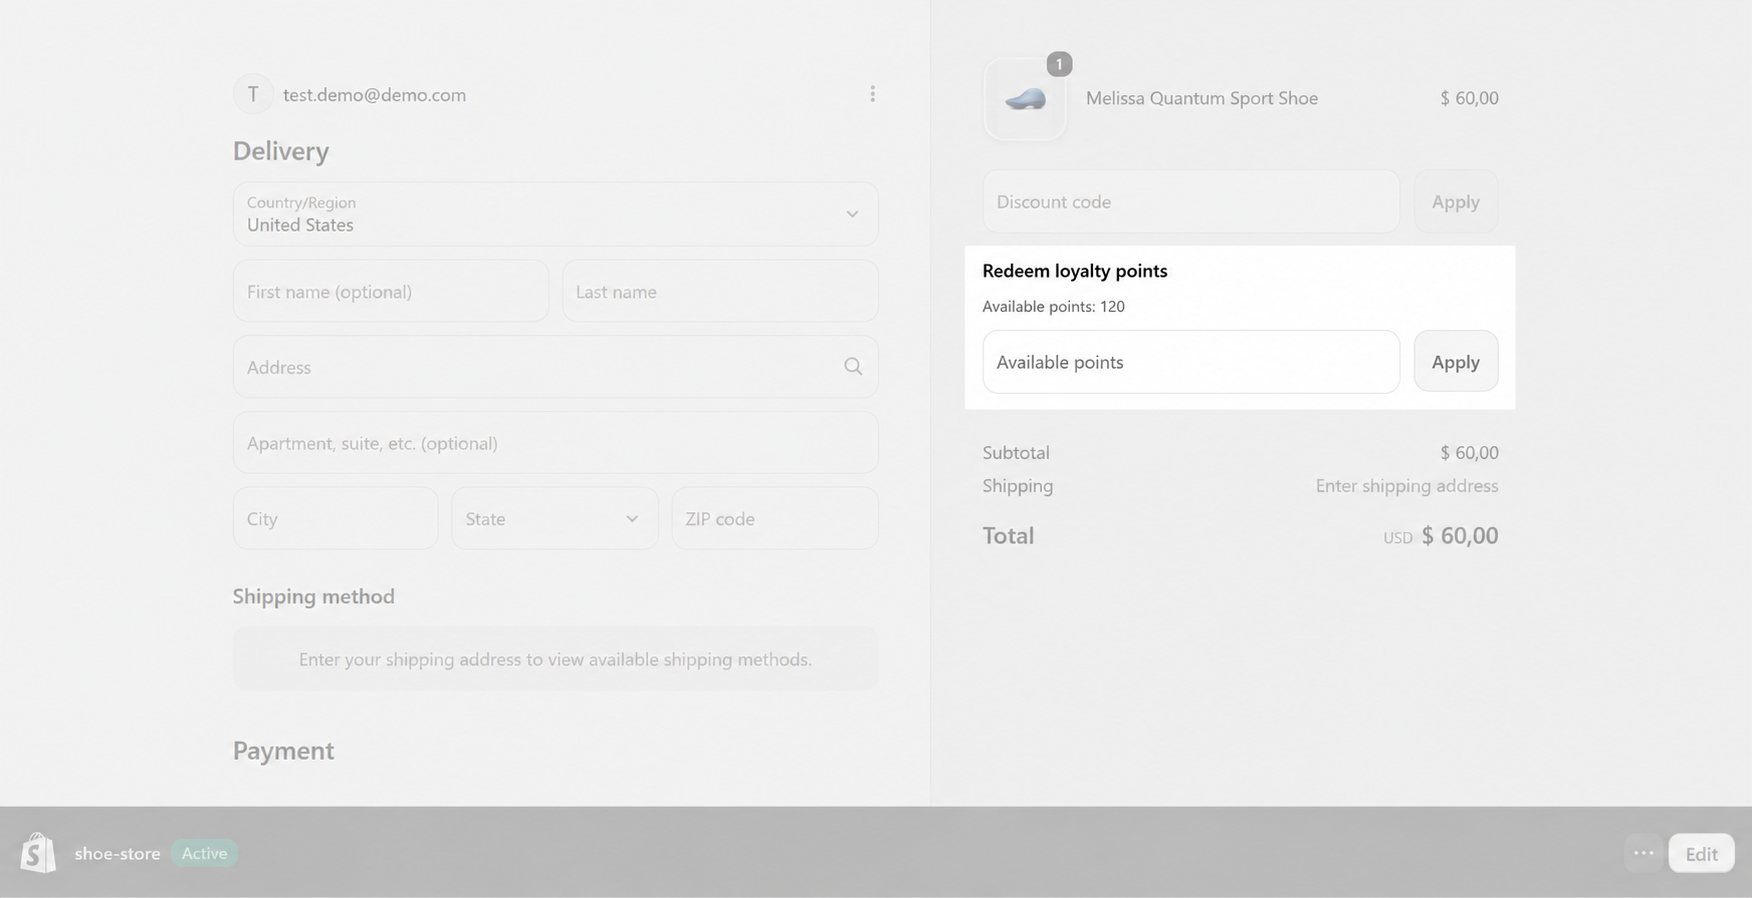
The Loyalty Points widget lets loyalty members redeem spendable points for a discount during checkout. Point conversion and eligibility are determined by the Burn rules configured in Antavo, while the Shopify app settings control how the redemption is presented and applied to an order.
Before adding the widget to the Checkout page, go to Apps > Antavo Loyalty Cloud > Points Burn and configure the following settings:
- Enable point redemption at checkout
- Discount name: Enter the label displayed as a discount item in the order summary when points are redeemed.
- Point reservation time: Set how long points remain unavailable after a customer removes an applied point redemption from checkout. During this period, the same points cannot be redeemed again.
This temporary reservation helps prevent repeated redemption attempts and the points being applied more than once. - Redemption limit: Enable this limit and set the maximum number of points that can be redeemed per order.
- Discount combinations: Select whether point redemption can be combined with product, order, or shipping discounts.
- Customize the customer-facing labels and messages displayed while using the widget
- Click Submit to save the settings
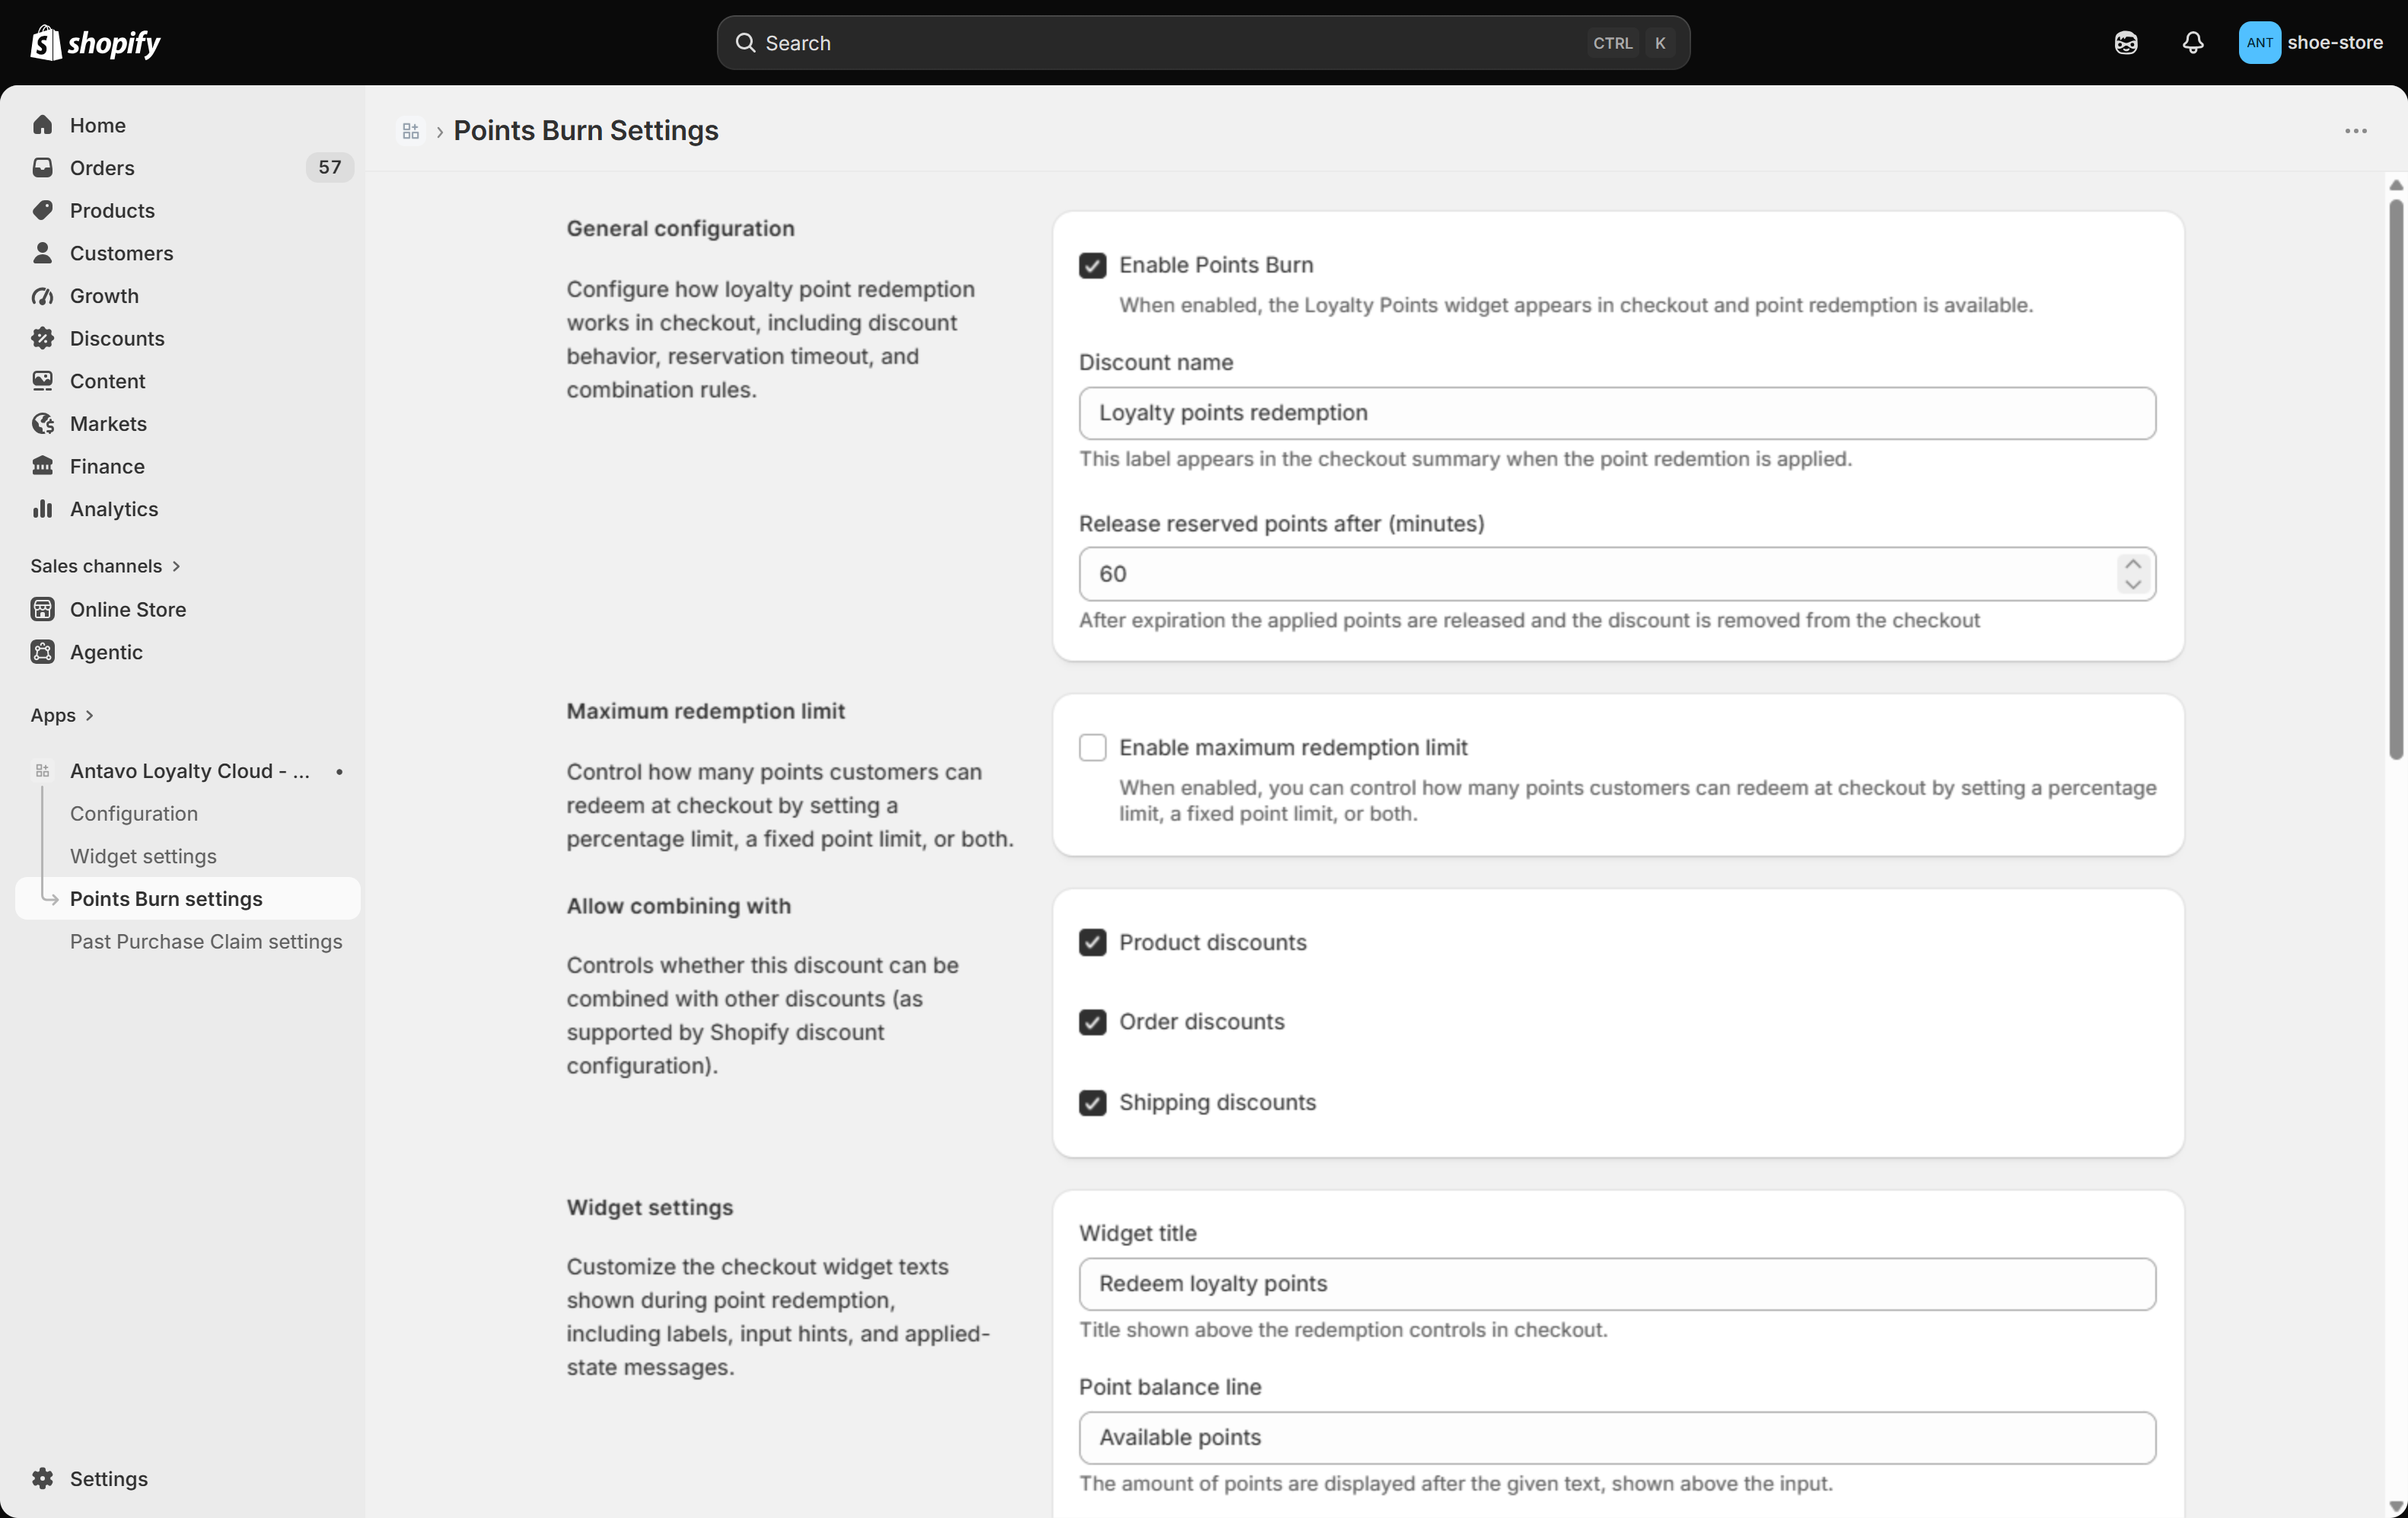
After the widget is added, eligible members can select how many points to redeem and see the corresponding discount in the order summary.
Past Purchase Claim widget
The Past Purchase Claim widget lets loyalty members claim eligible purchases from the Order status page. The widget can only be used when manual claiming is enabled.
To configure the widget:
- In the Shopify admin, go to Apps > Antavo Loyalty Cloud > Past Purchase Claim
- Select Enable manual claim
The other available options do not use the widget:- Disable past purchase claims: Prevents purchases from being claimed through the Shopify integration.
- Enable automatic claim: Automatically claims eligible past purchases for loyalty members without requiring customer action.
- Set the claim period: Specify how long after an order is placed the purchase remains eligible for a manual claim.
- Customize the customer-facing labels and messages displayed in the widget
- Click Submit to save the settings
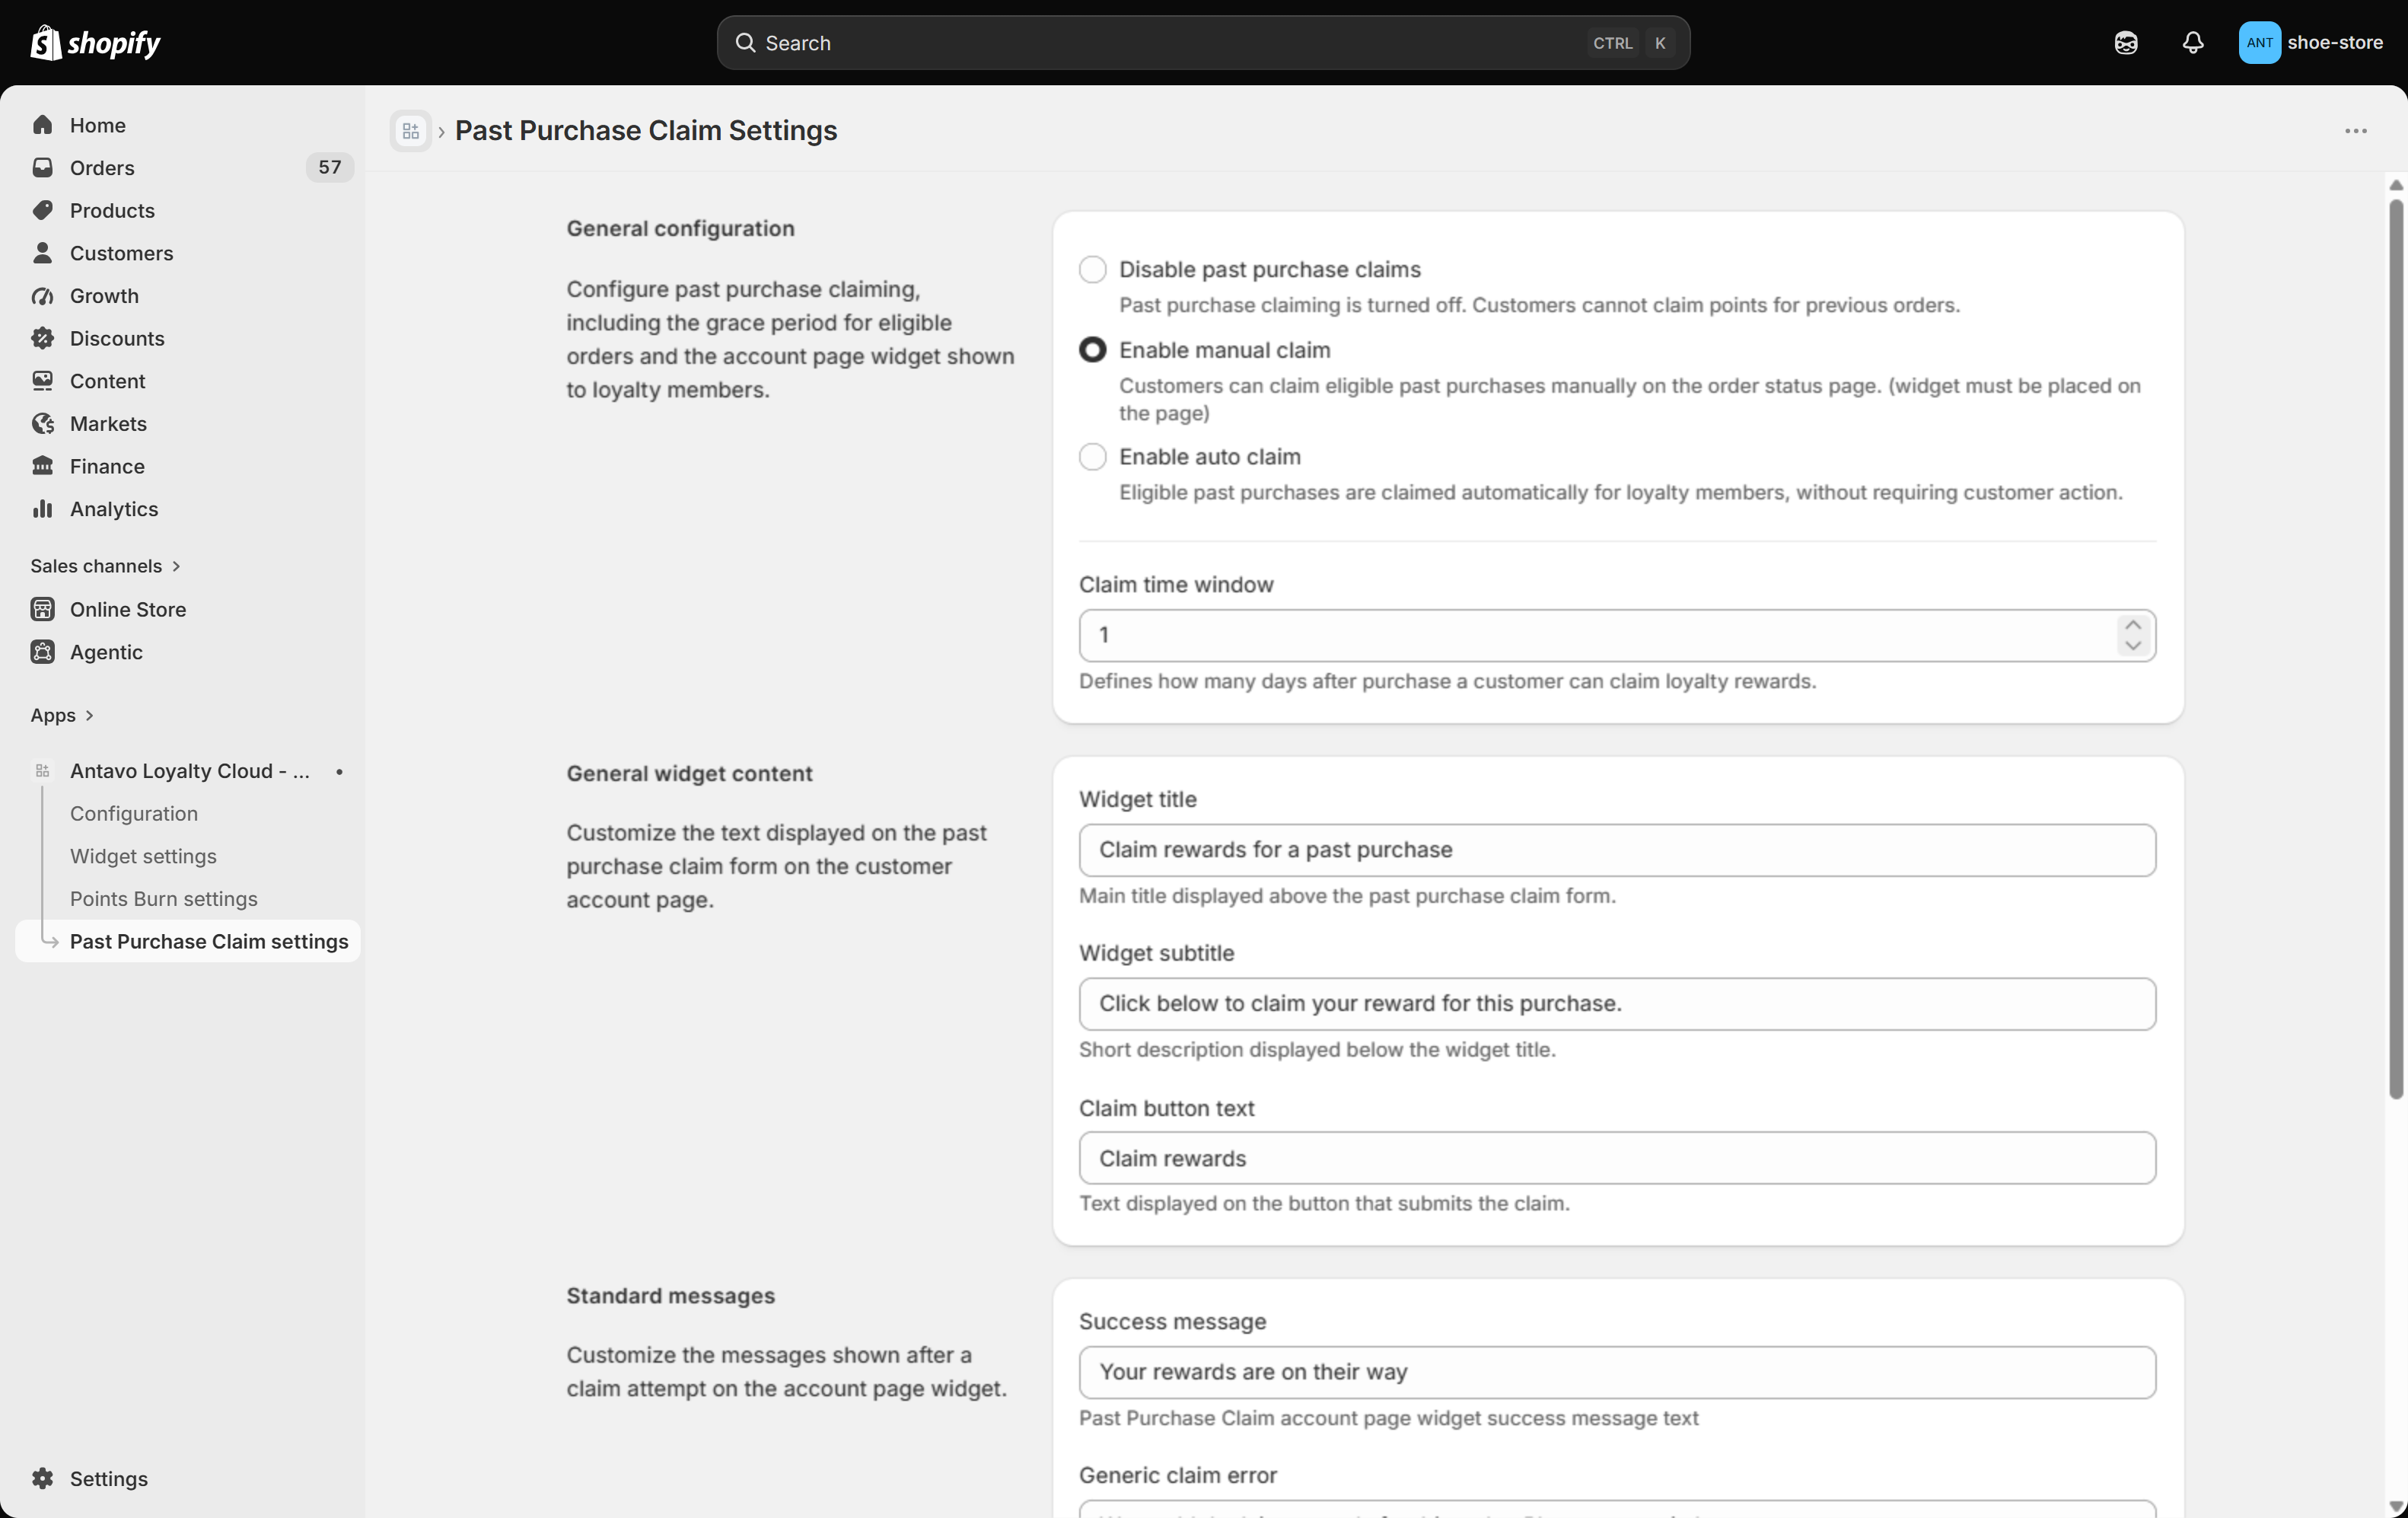
When manual claim is enabled, add the widget to the Order status page so customers can review and claim eligible orders.
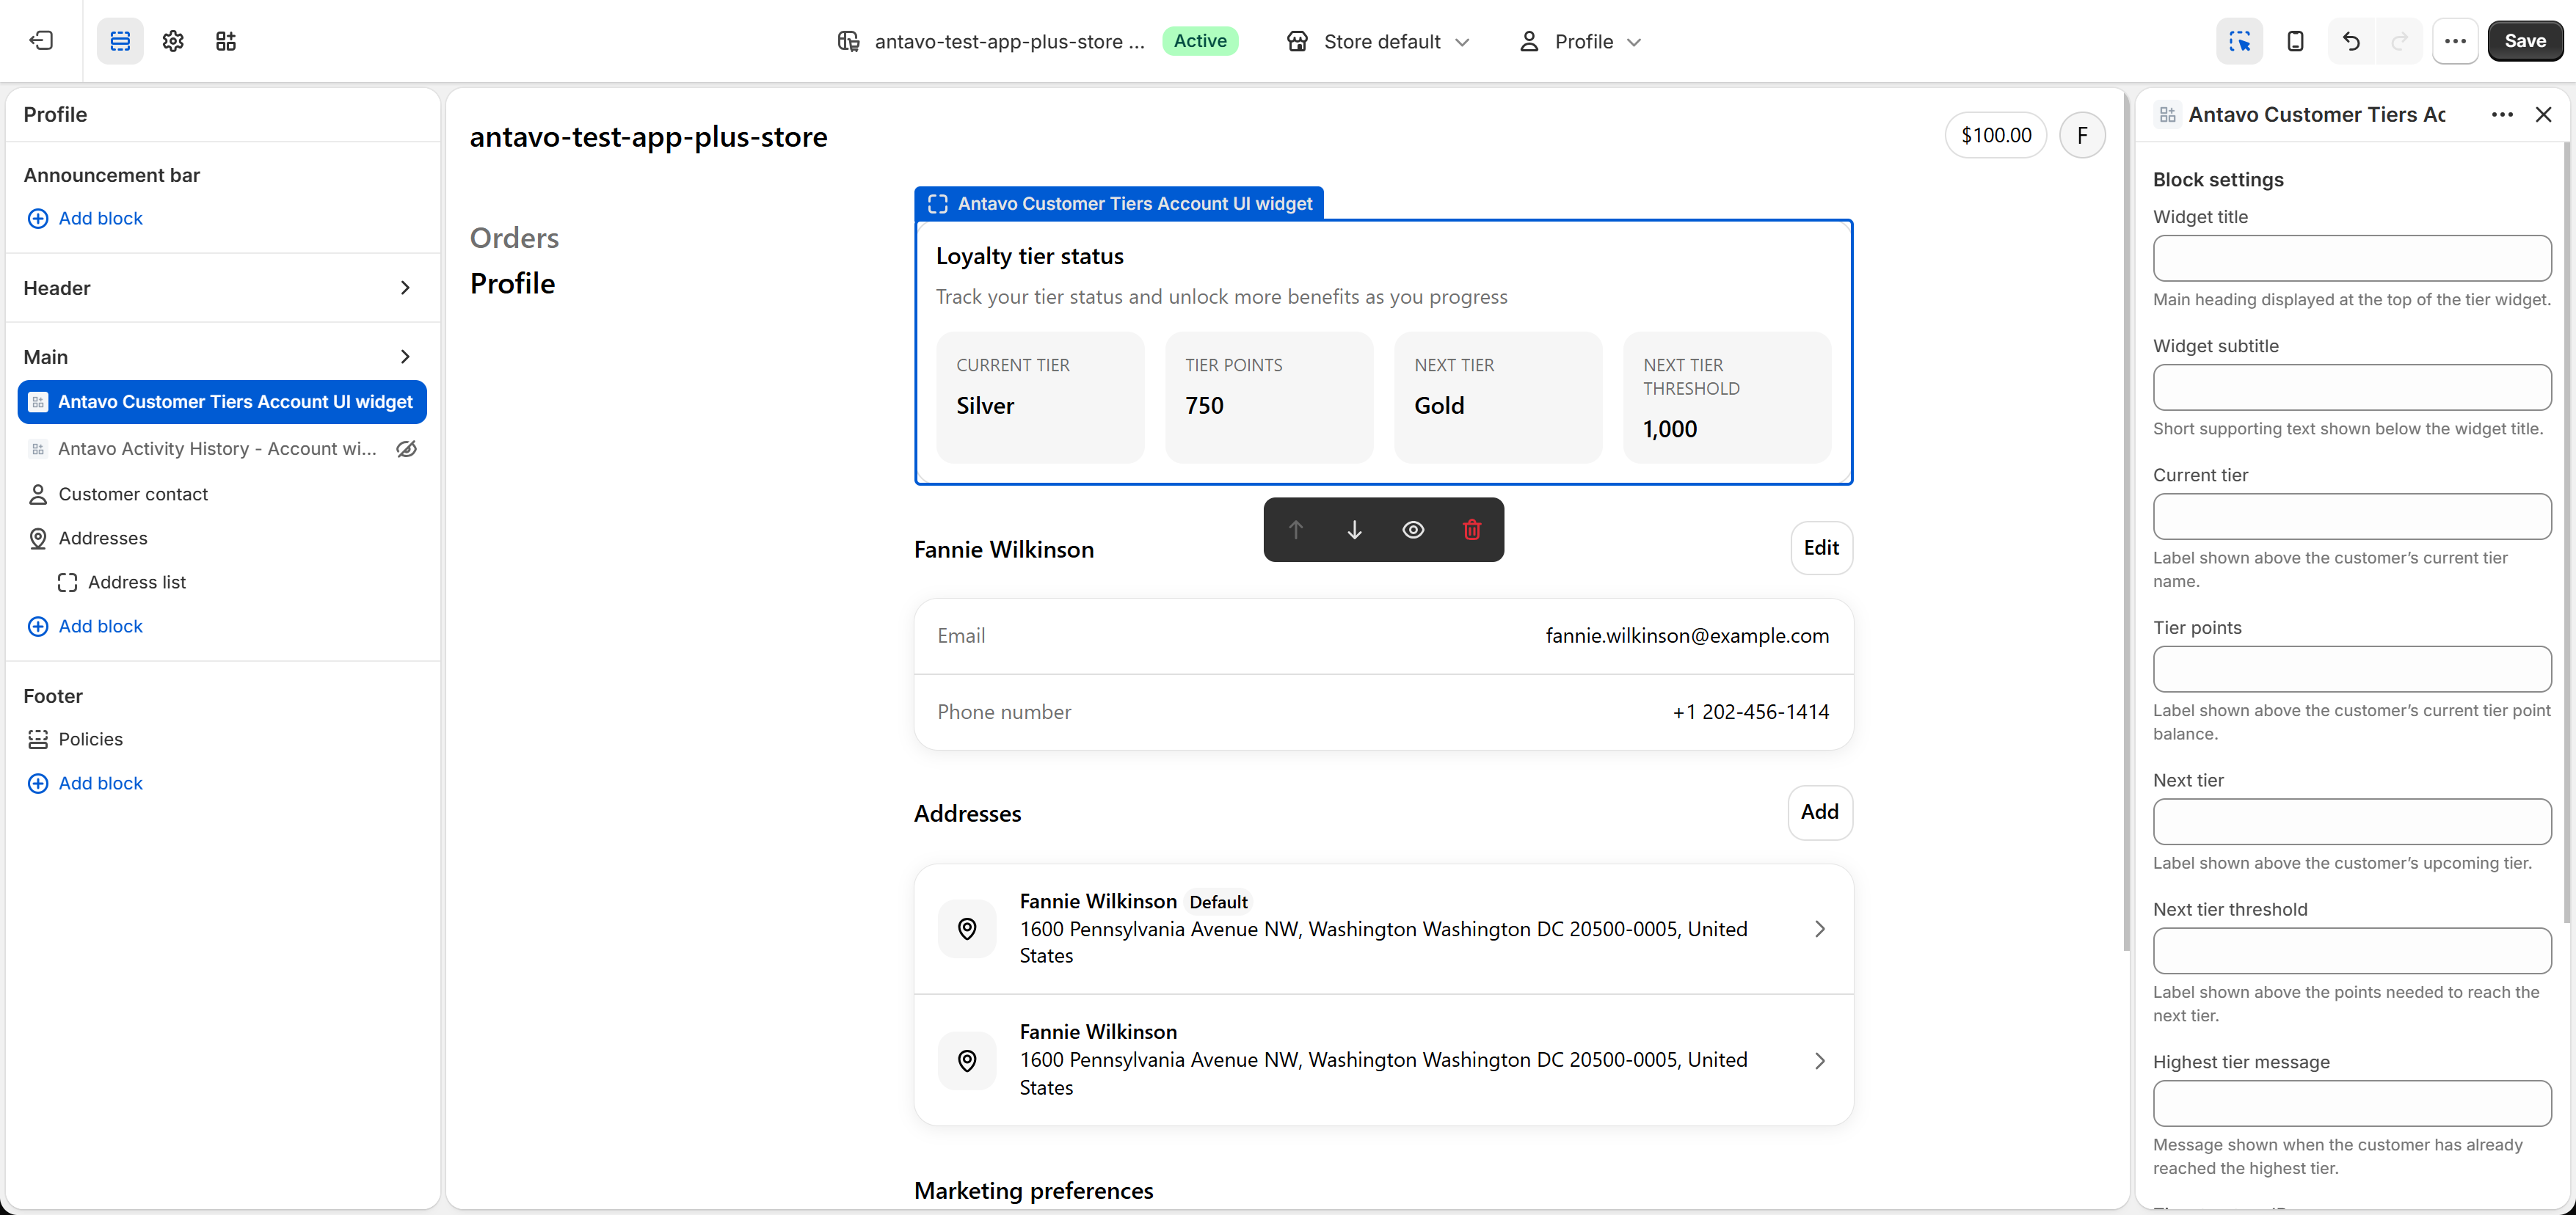
Customer Tiers
The Customer Tiers widget displays the customer’s current tier and progress toward the next tier on the Profile page. It provides the same tier-focused information as the online store theme widget, but is designed for the upgraded Shopify Profile page.
Add the Customer Tiers widget to the Profile page, then configure the available labels and messages. Click Save to publish the changes.
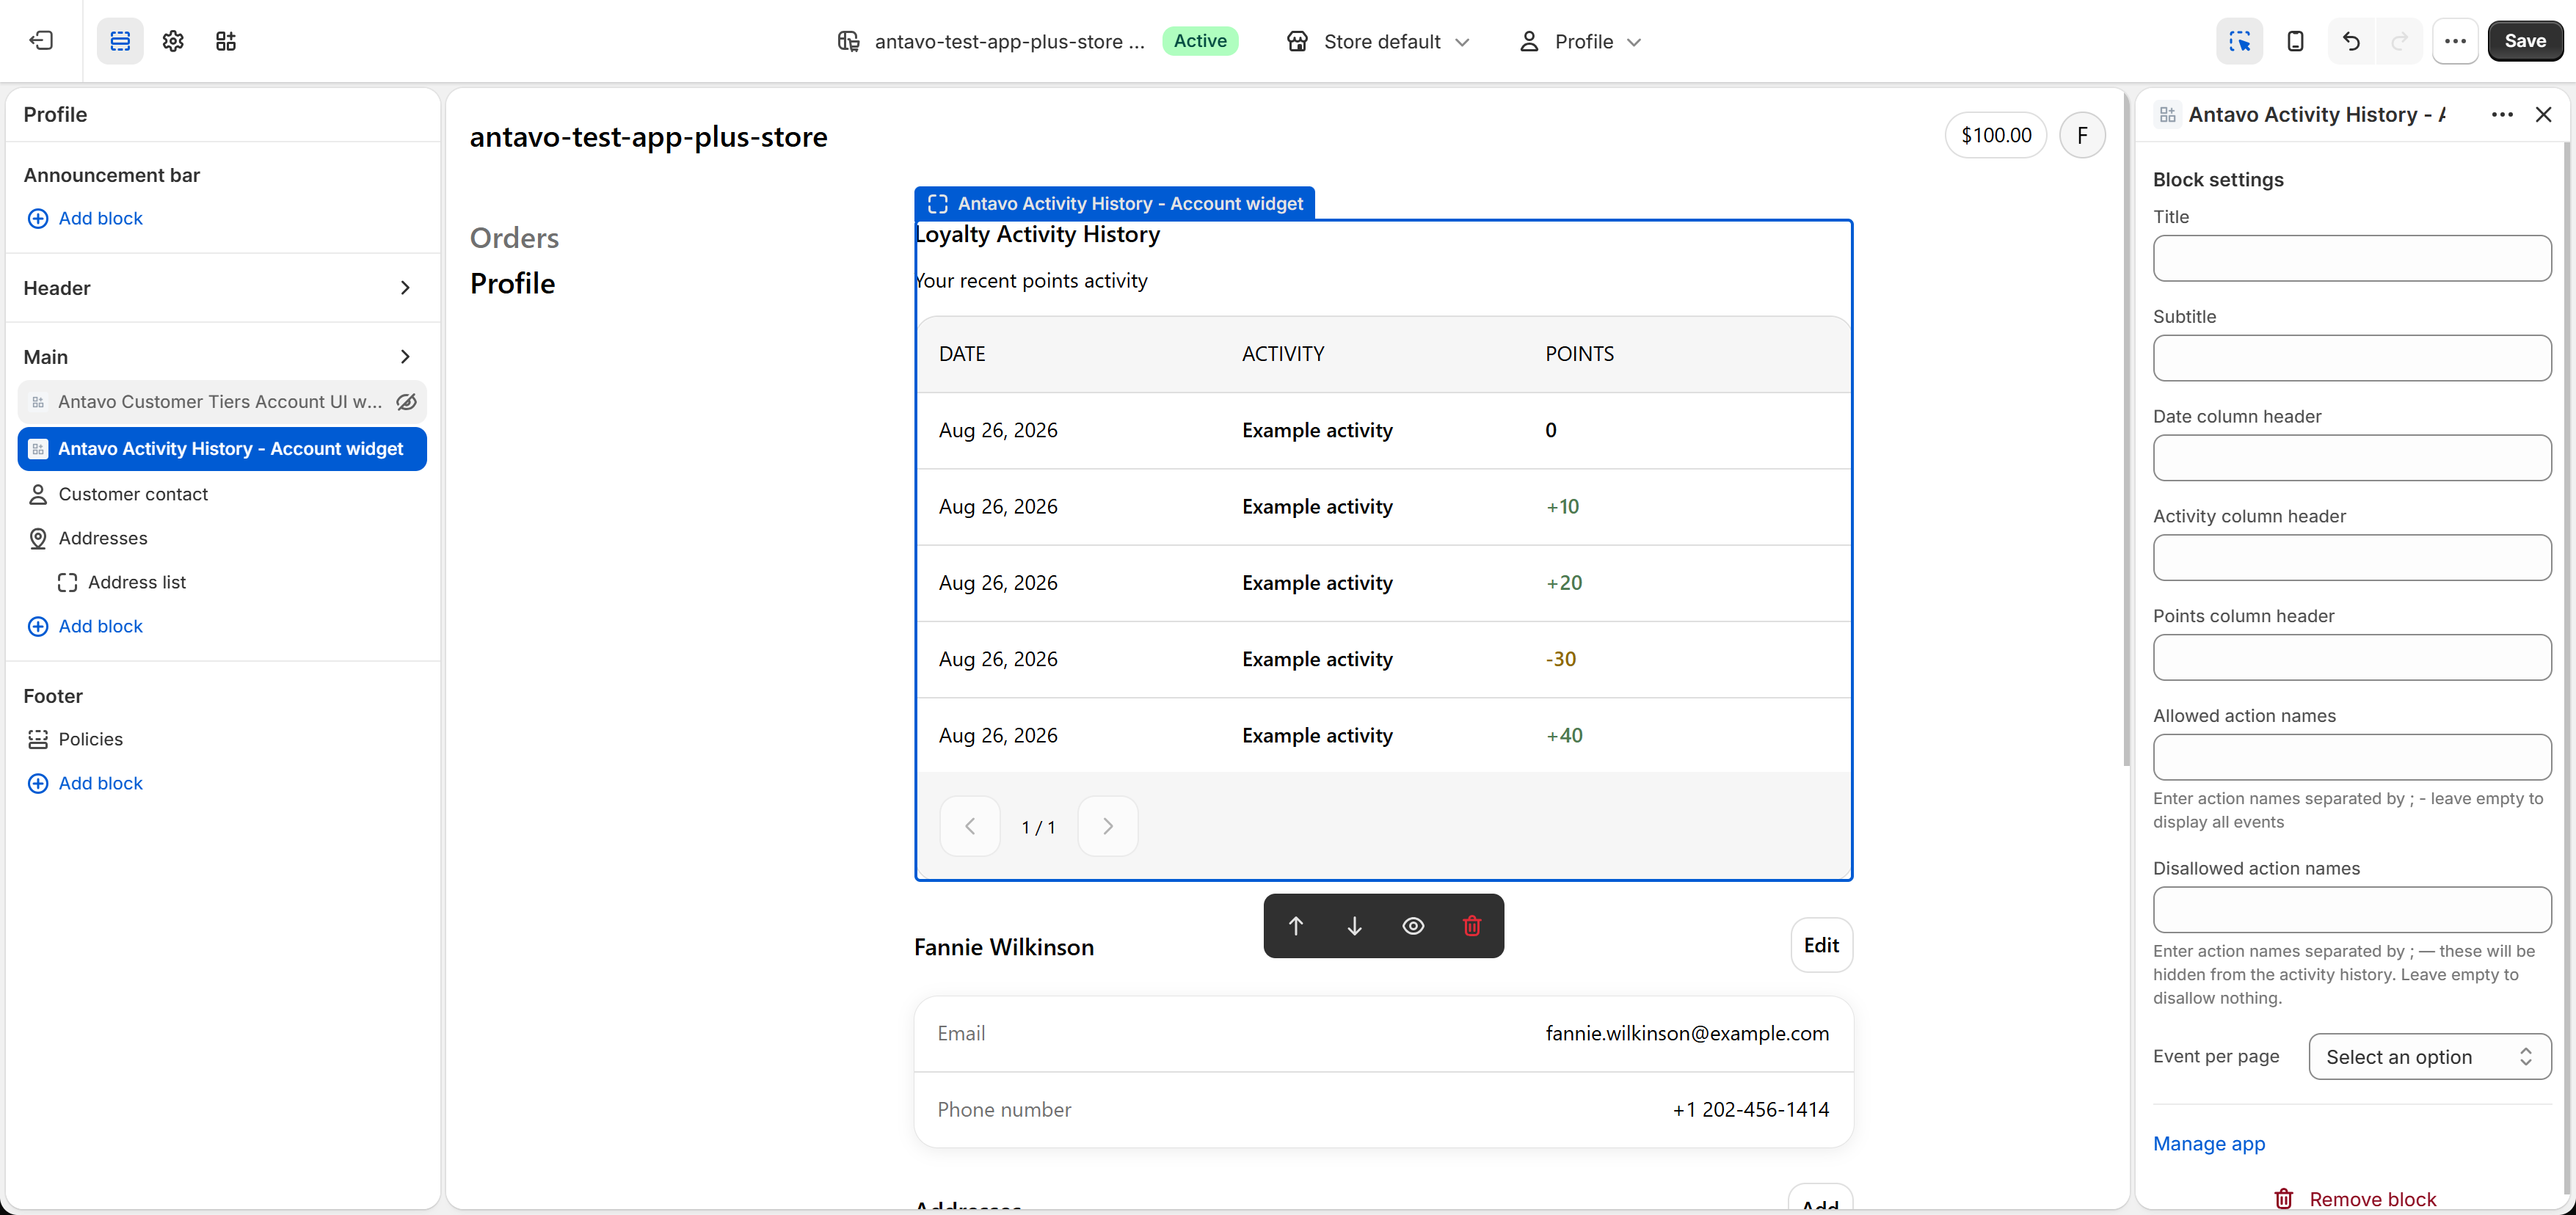
Activity History
The Activity History widget displays the customer’s loyalty activity, including point-earning and point-spending activities, on the Profile page.
Add the widget to the Profile page, then configure the following settings in the right sidebar:
- Customize the widget title, subtitle, and column headers
- Allowed action names: Enter the action names to display, separated by semicolons.
Leave the field empty to display all events. - Disallowed action names: Enter the action names to hide, separated by semicolons.
Leave the field empty if no events should be excluded. - Events per page: Select the number of events displayed on each page.
Click Save to publish the changes.
Coupon sync
The coupon sync feature allows you to automatically create and assign discount codes in Shopify when a reward is claimed, or a coupon is assigned to a customer in Antavo. It uploads the related coupon and customer data to Shopify during the sync.
This is a one-way synchronization from Antavo to Shopify. Coupons generated or assigned in Antavo will appear in the connected Shopify store as discount codes.
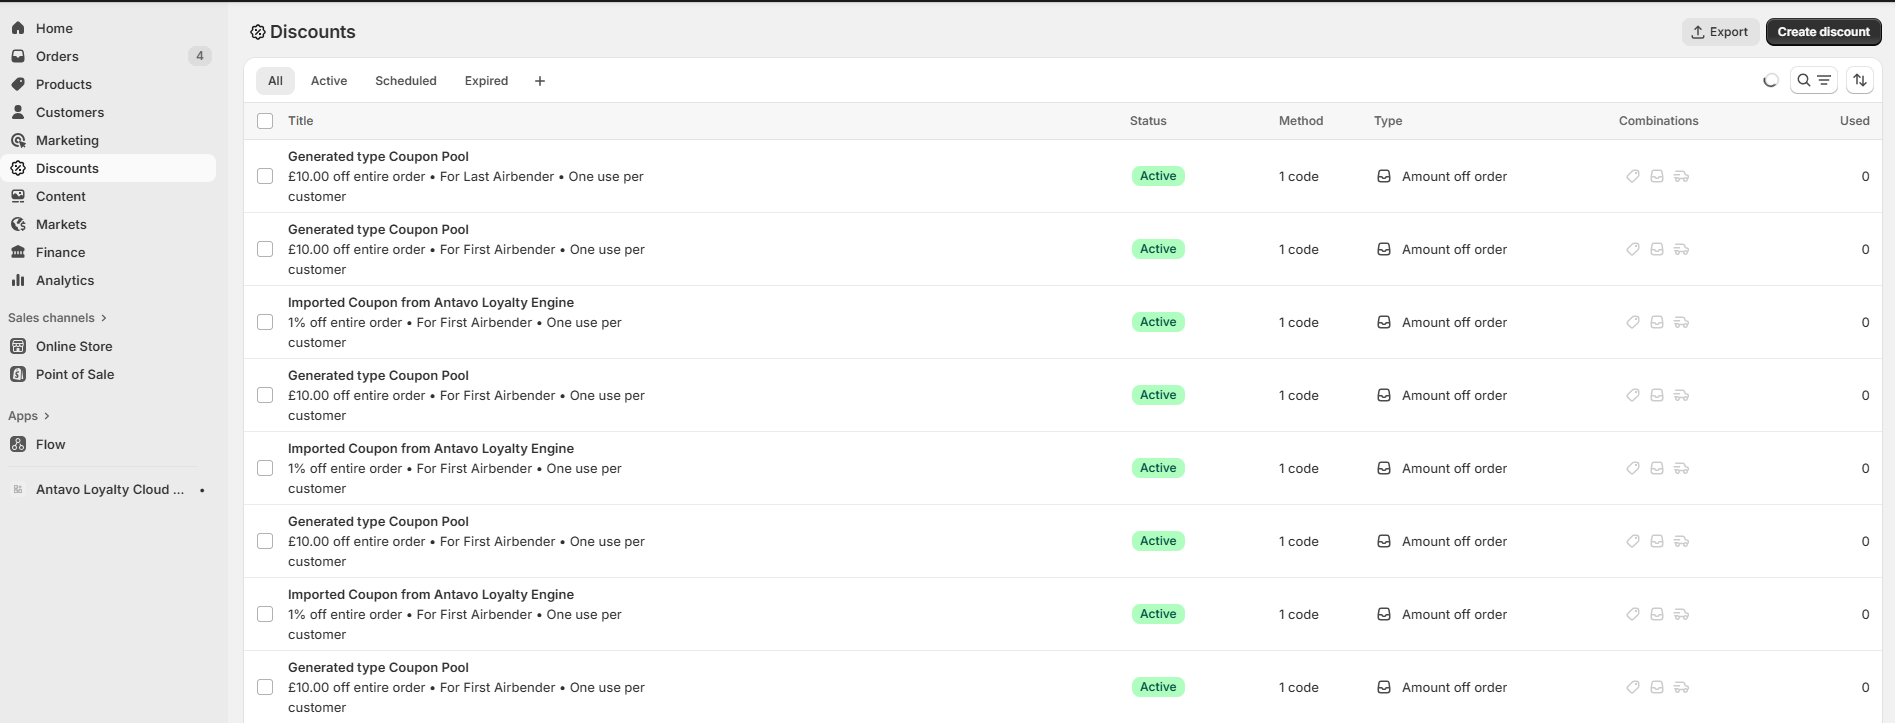
Synced coupons are listed in Shopify’s Discounts menu as active discount codes created by Antavo.
NoteThe unassign action (removing or revoking a coupon) and coupon transfer (moving the coupon from one customer to another) are not synchronized to Shopify.
Supported coupon types
Shopify synchronization supports customer coupons and referral coupons, including coupons configured for multi-use or subscription purchases. For coupon sources and pool configuration, see Coupons.
You can sync the following coupon pool types:
The following discount types are supported:
- Amount-based discounts
- Percentage-based discounts
If a coupon pool title is not available, Shopify displays the coupon title as Imported Coupon from Antavo Loyalty Engine.
Setup in a workflow
Synchronization is managed through the Shopify Coupon Sync workflow node, which is available when the Shopify integration is enabled. Add this node to any workflow where a coupon is issued (when a reward is claimed, a coupon is assigned to a customer, or referral coupons are booked).
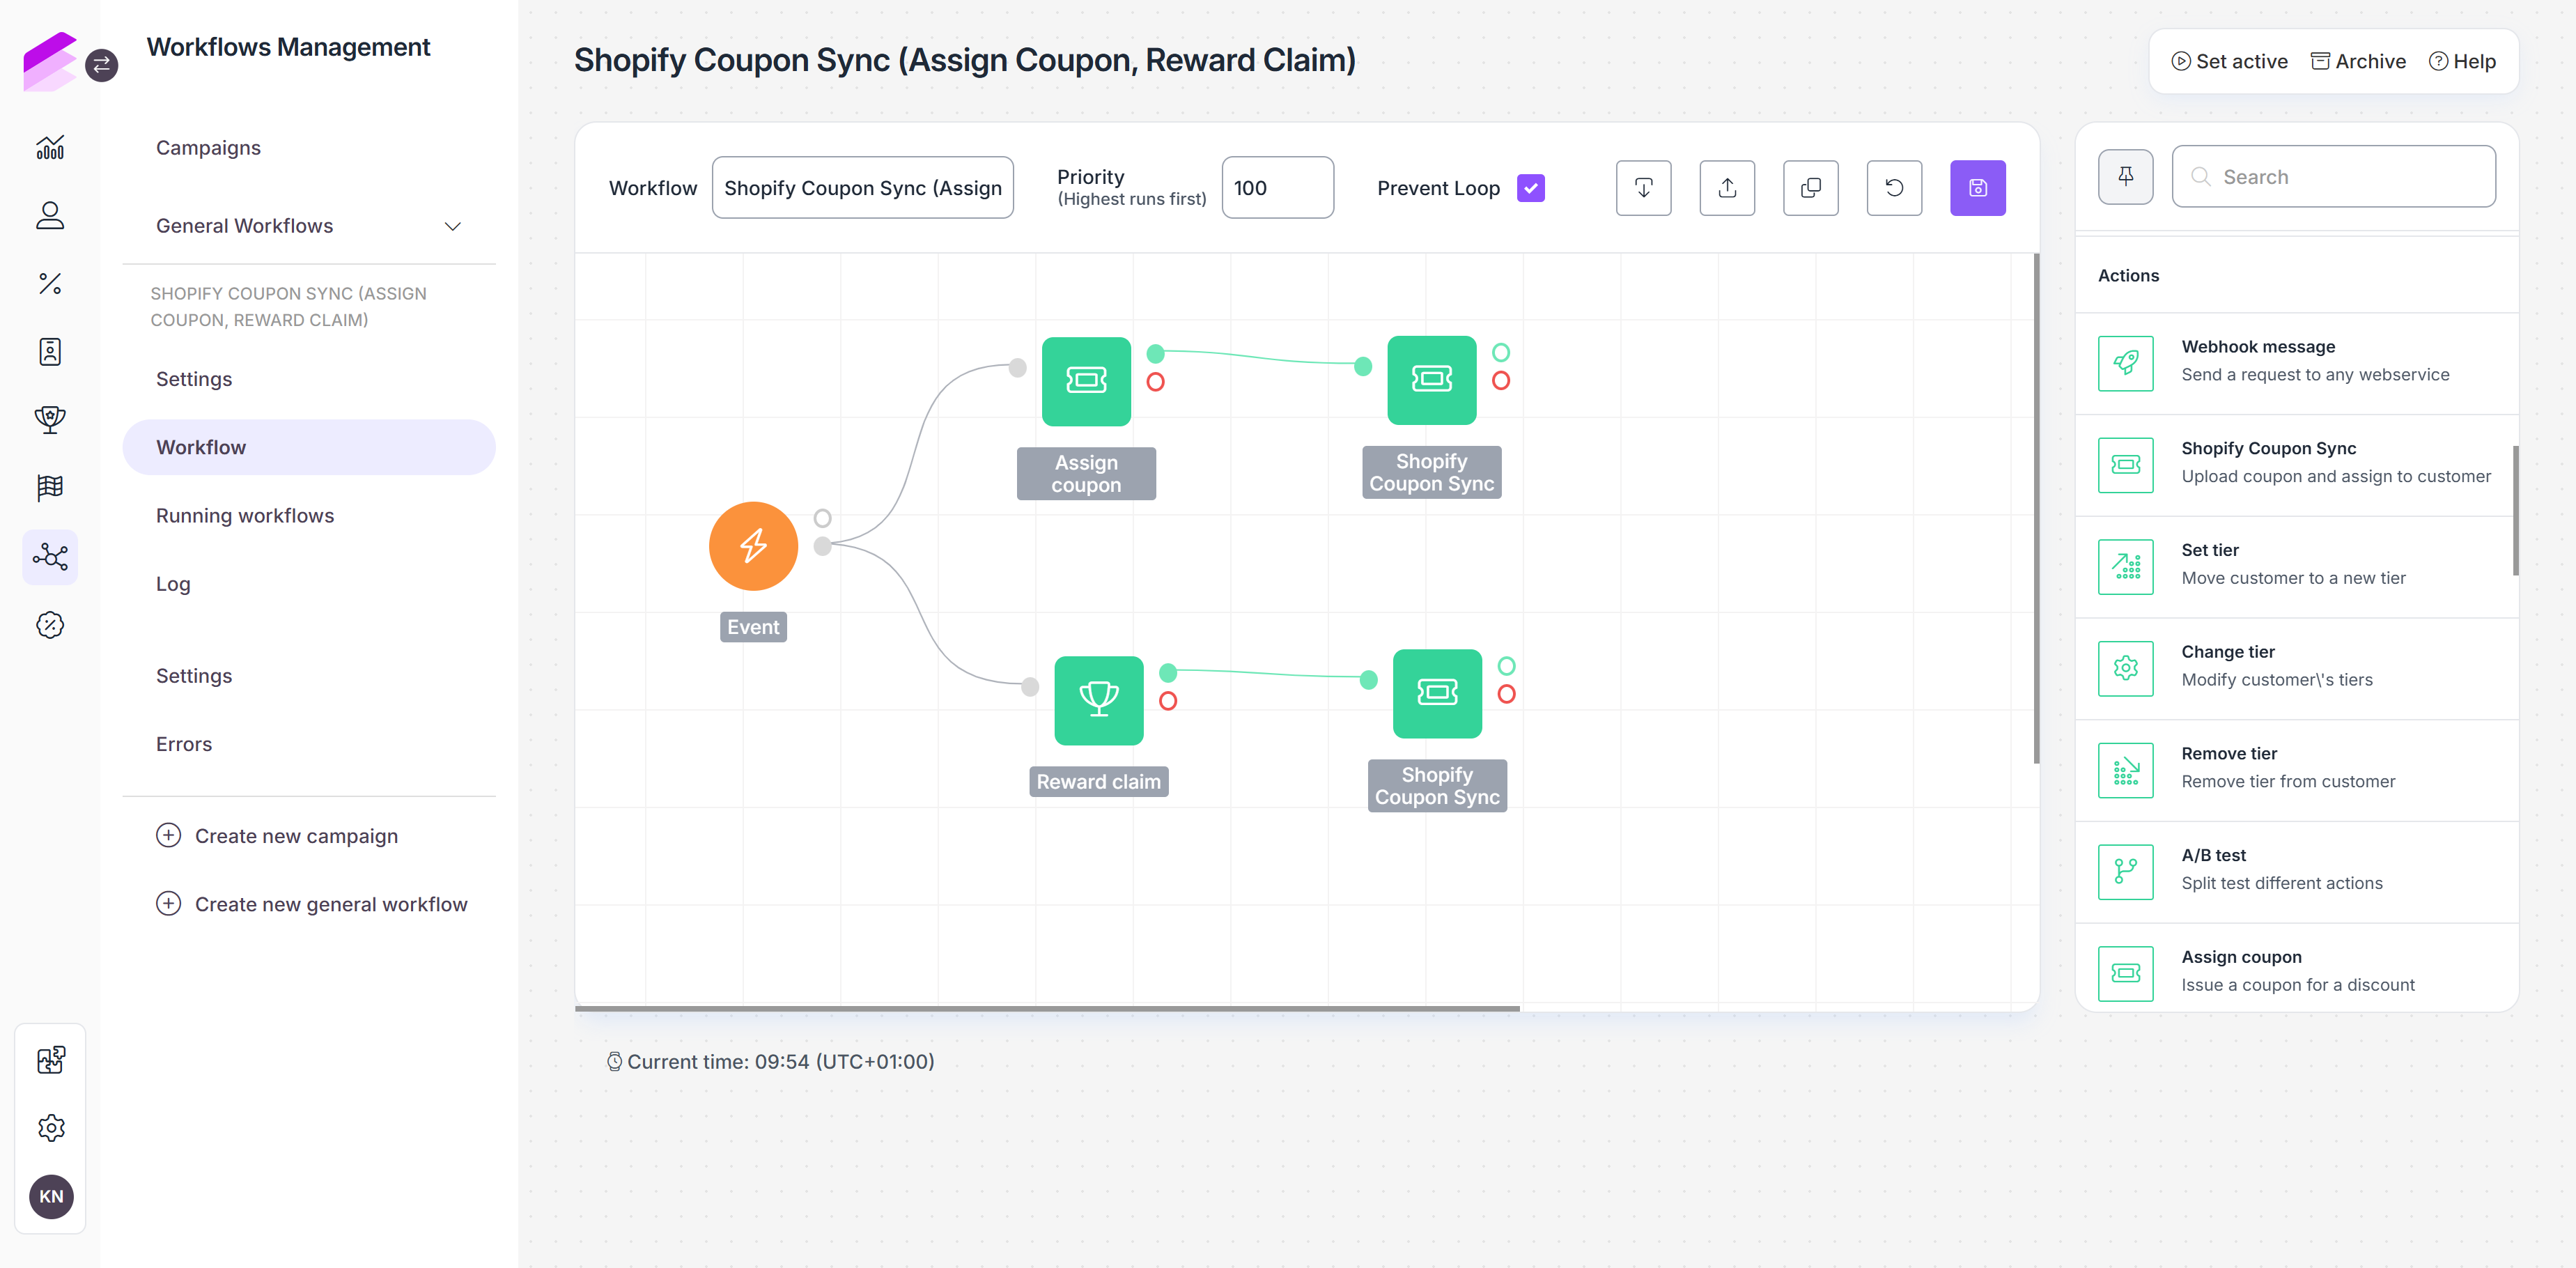
For details about the workflow node configuration, see Shopify Coupon Sync workflow node.
Monitoring coupon sync
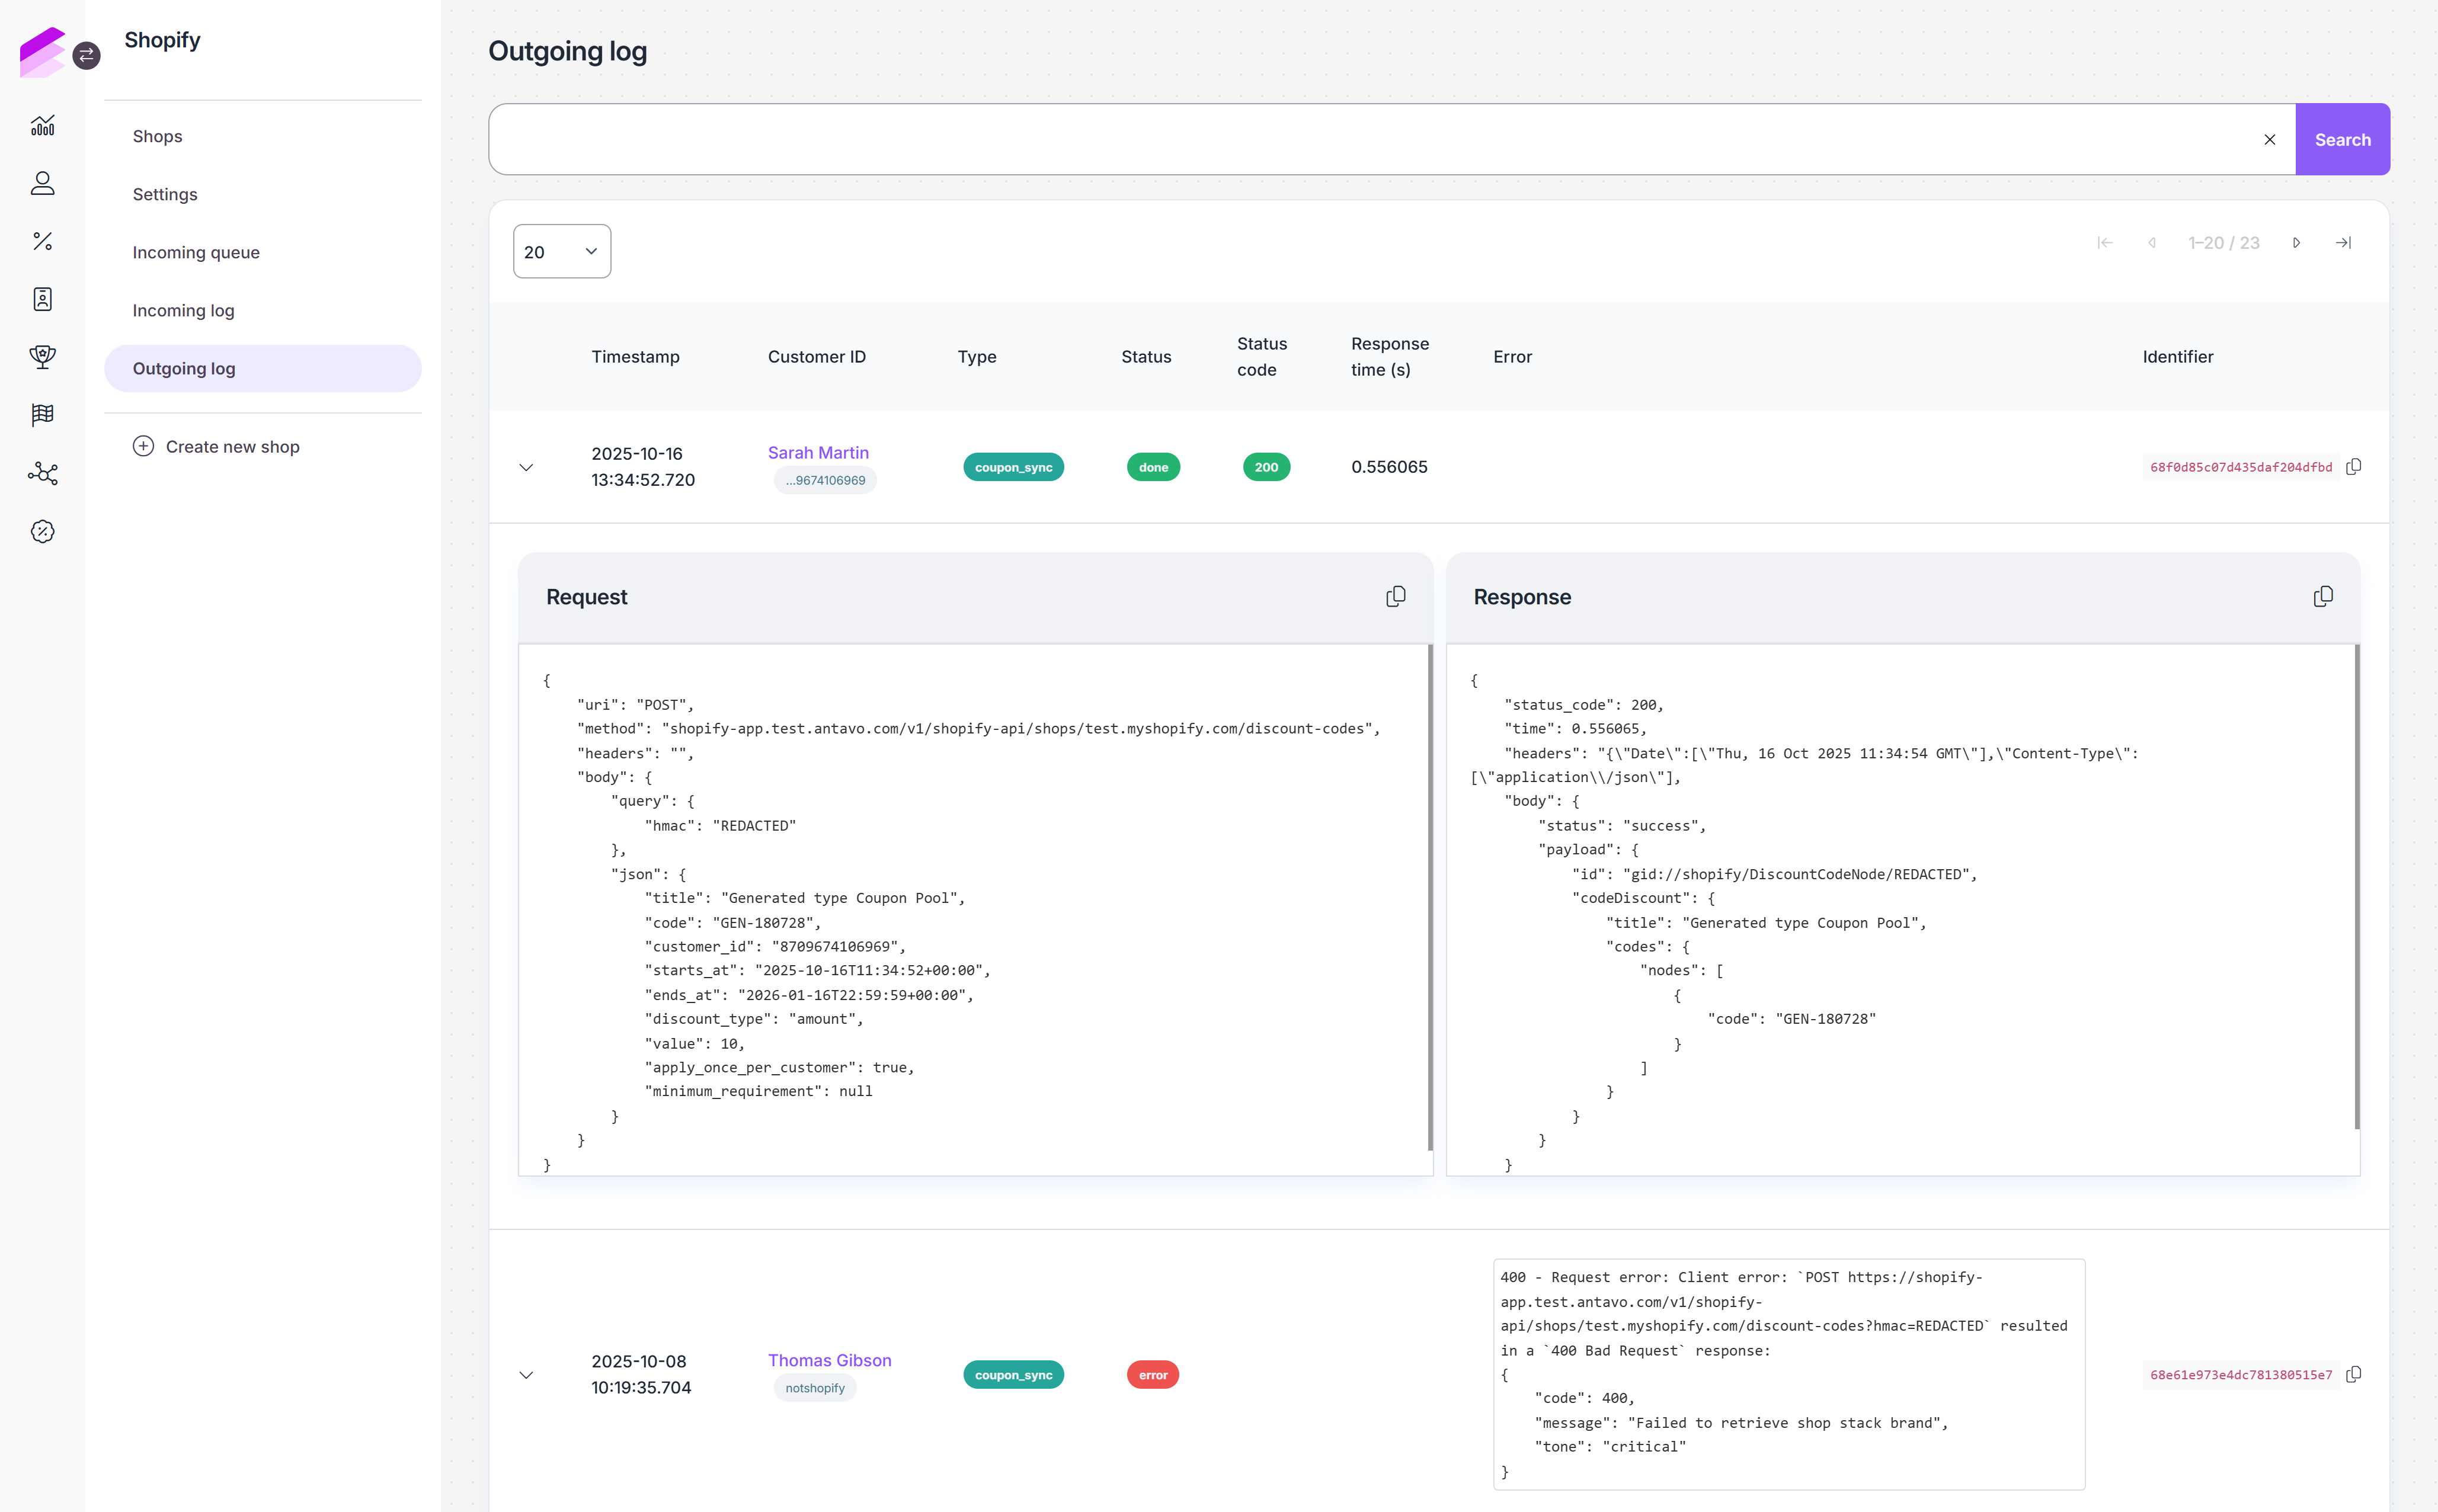
When the workflow triggers the sync, a log entry is created under Outgoing log in the Shopify module.
Each entry includes:
- Timestamp and customer ID
- Coupon type and status
- Response time and status code
- Error message (if applicable)
- Unique sync identifier
- Request and response details
Successful syncs appear with status Done (200), while errors (e.g., already existing coupons) are marked with Error (400).
Customer activity synchronization
The Shopify integration synchronizes loyalty membership changes, purchases, and customer profile updates with Antavo. The following sections explain how these activities are recorded and how to verify them in the Antavo Management UI.
Loyalty membership changes
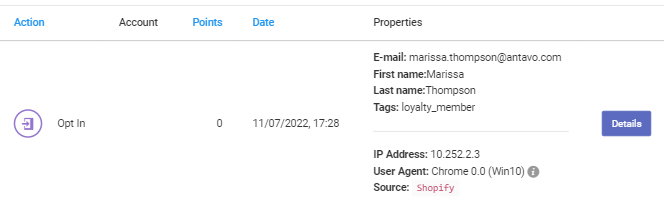
Customers can join or leave the loyalty program through the Loyalty opt-in and Loyalty opt-out widgets added to the Shopify storefront. Joining the program registers an opt_in event in Antavo, while leaving it registers an opt_out event and updates the customer’s membership status.
To verify a membership change:
- In the Antavo Management UI, go to Customer insights
- Open the customer profile and select the Events tab
- Confirm that the event log contains the corresponding
opt_inoropt_outevent
Purchases
Shopify order activity is synchronized with Antavo according to the mappings configured under Antavo webhook settings. Depending on the configuration, events can be registered when an order is created, updated, fulfilled, canceled, deleted, or refunded.
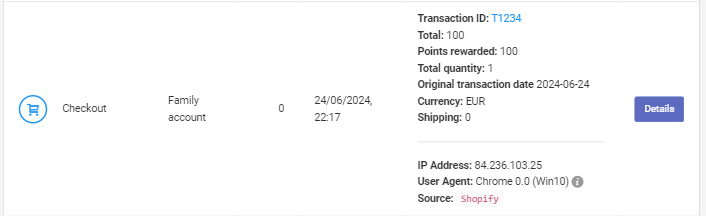
These Shopify activities may register checkout, checkout_update, checkout_accept, checkout_reject, or refund-related events in Antavo. Multiple events can therefore be associated with the same transaction as the order progresses: its details may be updated, a pending transaction may be accepted or rejected, and partial or full refunds may be recorded. Antavo updates the transaction and any related loyalty points based on the registered event and the workspace configuration.
To verify a purchase or a subsequent order change:
- Navigate to the Customer insights tab in Antavo’s left sidebar
- Open the customer profile and select the Events tab
- Confirm that the event log contains the events mapped to the corresponding Shopify activities in the webhook settings.
You can use the transaction ID to review the complete sequence of events associated with the same order.
Customer profile updates
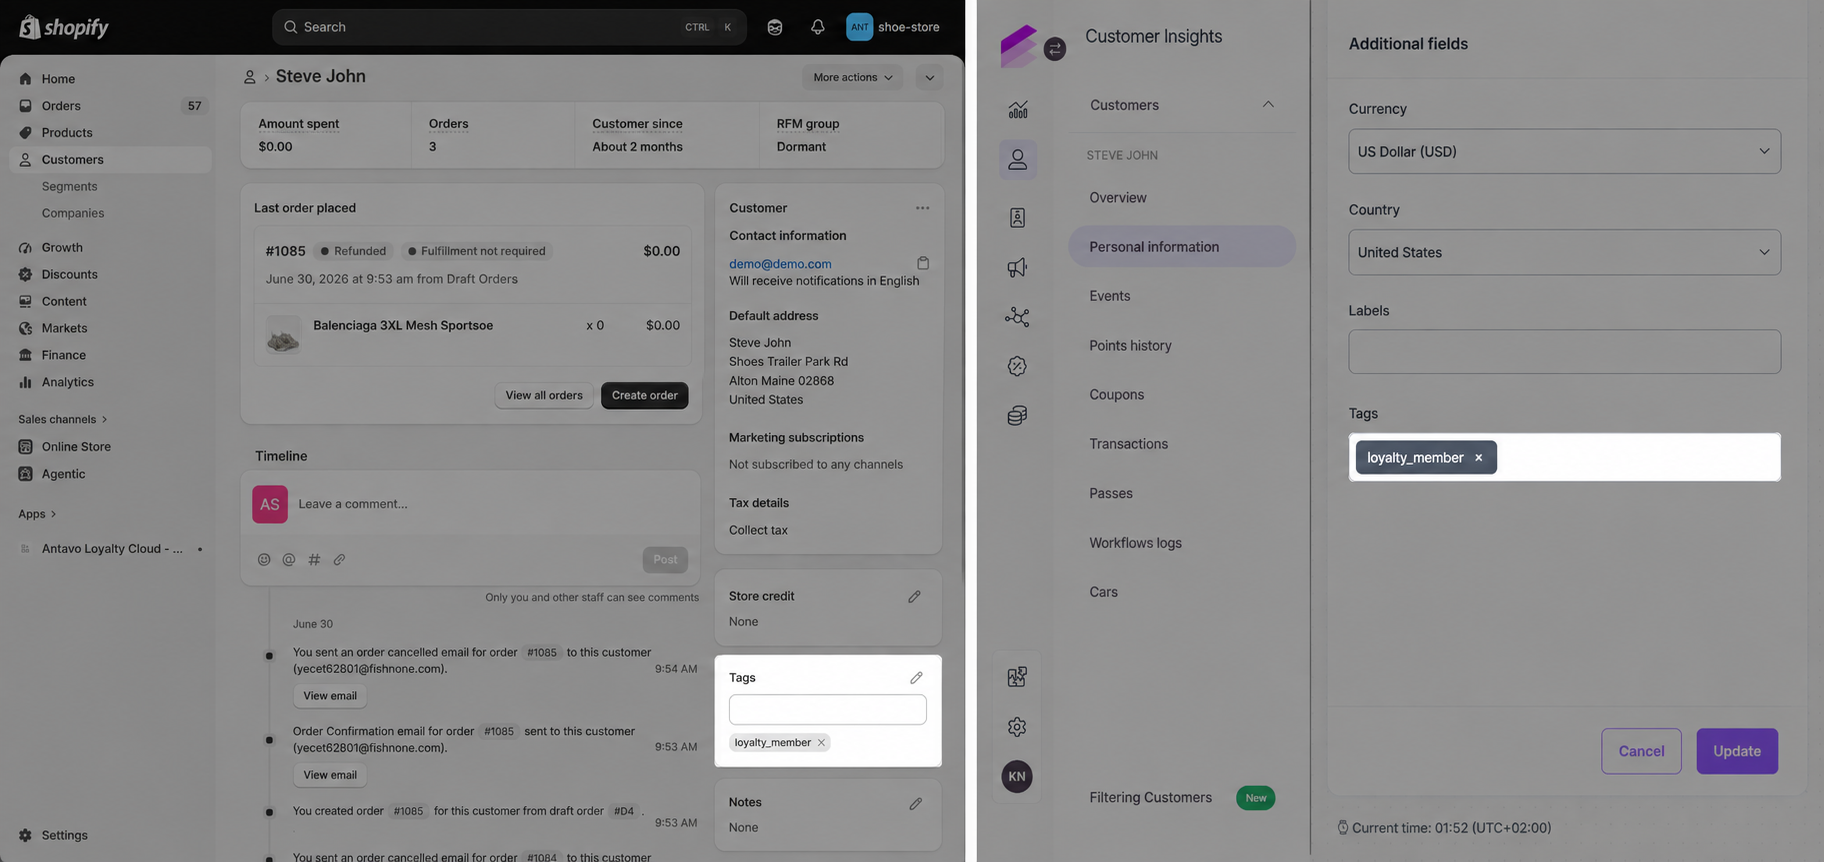
When customer details are updated in Shopify, the integration synchronizes the supported profile changes with Antavo. This includes tags added to or removed from the Shopify customer profile. Tag changes made in Antavo are not synchronized back to Shopify.
Synchronized tags are stored in the Tags field of the Antavo customer profile and can be used in segmentation and loyalty program configuration.
To verify synchronized tags:
- In the Antavo Management UI, go to Customer insights and open the customer profile
- Select the Personal information tab
- Under Additional fields, compare the Tags value with the tags in Shopify
Updated 6 days ago